It becomes quite the battle when you can’t decide what type of countertop material you should choose. Have you narrowed down the materials you think will look good in your kitchen? Once you’ve finalized your choice of material, the next step is to read about its pros, cons, and maintenance cost.
Today, we will be discussing two of the most common countertops materials — marble and granite and mainly will be focusing on how to polish them so they look great in your home.
Before we begin, let’s discuss the two stones:
Granite
“Hard as a rock” is a term that is often put in sentence wherever granite is mentioned and why shouldn’t it be? Made from molten rock, granite is extremely durable and hard. It doesn’t blister, has heat-resistant qualities, doesn’t get chipped or scratched, and offers a luminous surface that makes it perfect for countertops.
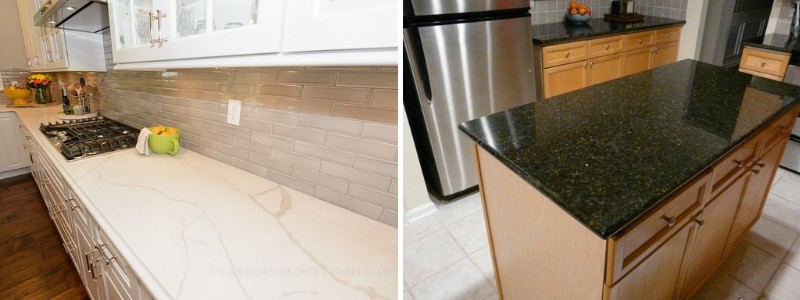
The white material visible in granite is feldspar and the gray veins are quartz, both of which are mineral crystals. Lastly, black is mica and, together, these three materials give granite its perfect look.
It takes a lot of time and effort to make granite countertops. The material is grilled, chiseled, and then blasted in large blocks out of quarries. A special machine cuts the final product into workable slabs, delivering you the countertop on which you chop your vegetables.
Marble
Let’s talk about marble countertops. They are elegant, bright, and the first choice of some homeowners. It is available in costly and cheap stones, but the reason why people hesitate before choosing them for countertops is that they believe it is high maintenance.
Marble is made from sediment, which crystallizes under heat or pressure and forms a hard rock… not as hard as granite. The only drawback of marble is that it’s porous and susceptible to staining. Moreover, acid can cause etching on the countertop’s surface. The good news is that as marble ages, it becomes more beautiful.
The following are a few tips that will tell you all about how to polish granite and marble countertops:
How to Polish Granite Countertop
You can either use a store-bought or DIY cleaner to polish and clean the countertop. Making the DIY solution is actually quite simple and allows you to frequently clean the surface anytime when you run out of the store-bought cleaner.
Things You Will Need
- Sponge
- Paper towels
- Gentle liquid soap
- Warm water
- Small bowl
- Non-abrasive cloth
- Baking soda
- Granite cleaner
- Empty spray bottle
- Granite-safe stone polish
-
Step #1 : Clean the Countertop
Before you start polishing the countertop, you need to thoroughly clean it and remove any dirt and caked-on grime. Use the granite cleaner to clean the countertop. Jut spray on the liquid and wipe down the surface using a soft sponge. Next, dry the surface using a paper towel.
-
Step #2: Using DIY Cleaner
If you want to make your own cleaner, then you can use a couple of basic home supplies. In a spray bottle, combine warm water and liquid soap. Shake the bottle until suds form and then follow the same cleaning instructions as mentioned above.
-
Step #3: Using the Polish
Make sure that the polish you are using is granite-safe. Each polish comes with slightly different instructions. Some are wiped immediately after they are applied, while others need to be left on the surface overnight to remove hard stains.
Follow the instruction written on the back of the polish and the use a non-abrasive, clean cloth to buff the countertop. Go in broad, circular motions and then rinse the polish following the instructions.
-
Step #4: Using DIY Polish
Combine ¼ cup baking soda and 3 cups warm water in a spray bottle. Use the same circular motions to buff the surface and then clean the countertop using paper towels.
How to Polish Marble Countertop
-
Step #1: Use Non-Abrasive Liquid Soap
Clean the marble countertop by making a DIY solution with water a light liquid soap. Follow the same instructions as outlined in step 1 of cleaning granite countertop. If there are stains on the surface, consider using a store-bought marble stain remover before proceeding to step 2.
-
Step #2: Use a Marble Countertop Cleaning Kit
You need to be very careful when cleaning a marble counter, which is why it is best to stick to a store-bought solution. A marble cleaning kit such as one by Dia-Glo will work great here. It contains the following items:
- 1-quart Dia-Glo polishing compound
- 1-3″ hook and loop backed dense felt wheel
- 1-3″ rigid backer for the felt wheel
- 1-¼ liter Tenax Hydrex Impregnating Stone Sealer
Attach the felt wheel and backer to the polish. Pour the polish on the surface and cover small areas at a time. For corners, use a compound cloth to rub in the polish. Make sure to keep your hand light. Once the entire surface is covered, use a dry cloth to remove the polish and then a damp cloth to wipe any traces of the compound. Apply the sealer the next morning with a soft rag.
-
Step #3: Using DIY Polish
Make a paste using baking soda and water. Apply it on the stains and leave it for 24 hours. Wipe the dried baking soda with a damp cloth. Combine 3 tablespoons of baking soda and 1 quart of warm water in a spray bottle. Use the same circular motions to buff the surface and then clean the countertop using paper towels.
Crush chalk in a bowl and then dip a damp sponge into it. Clean the surface thoroughly and then wipe the surface with paper towels. Finally, use a chamois to give the countertop a stainless shine.
There you go… the easiest way to clean and polish granite and marble tops. Now that you know about the pros and cons of both countertops and how they are cleaned, you can make an informed decision. If you are looking for more informatory articles such as this one, then visit Epic Home Ideas.
Related Posts
- Comparison of HardieBacker Cement Board vs Plywood For Tiling Projects
- 6 Great Alternatives to HardieBacker Cement Board
- Comparison of WonderBoard vs GoBoard Used as Tile Backer Boards
- How Much Does it Cost to Furnish a House – Living Room,Bedroom,Kitchen etc
- 5 Benefits of Spray Foam Insulation During Summer
- Here are Some Plumbing Installation Tips For your New Home
Leave a Reply