Welcome to our collection of 25 awesome and useful infographics and cheat sheets that we have curated from around the web about interior design and home decoration topics. We believe that every home owner must see the following collection and bookmark this page for easy reference.
The infographics and cheat sheets below include topics such as basic principles of interior design, best colors for your home, design and decor styles, kitchen-bathroom-living room layout guides, kitchen space design, tips for living comfortably in small spaces, renovations to add value to your home, saving money with green upgrades and much more.
Have a look at the table of contents below for the topics we’ll be covering in this article:
1) A buyers’ guide to home flooring types
source: http://visual.ly/buyers-guide-custom-home-flooring-types
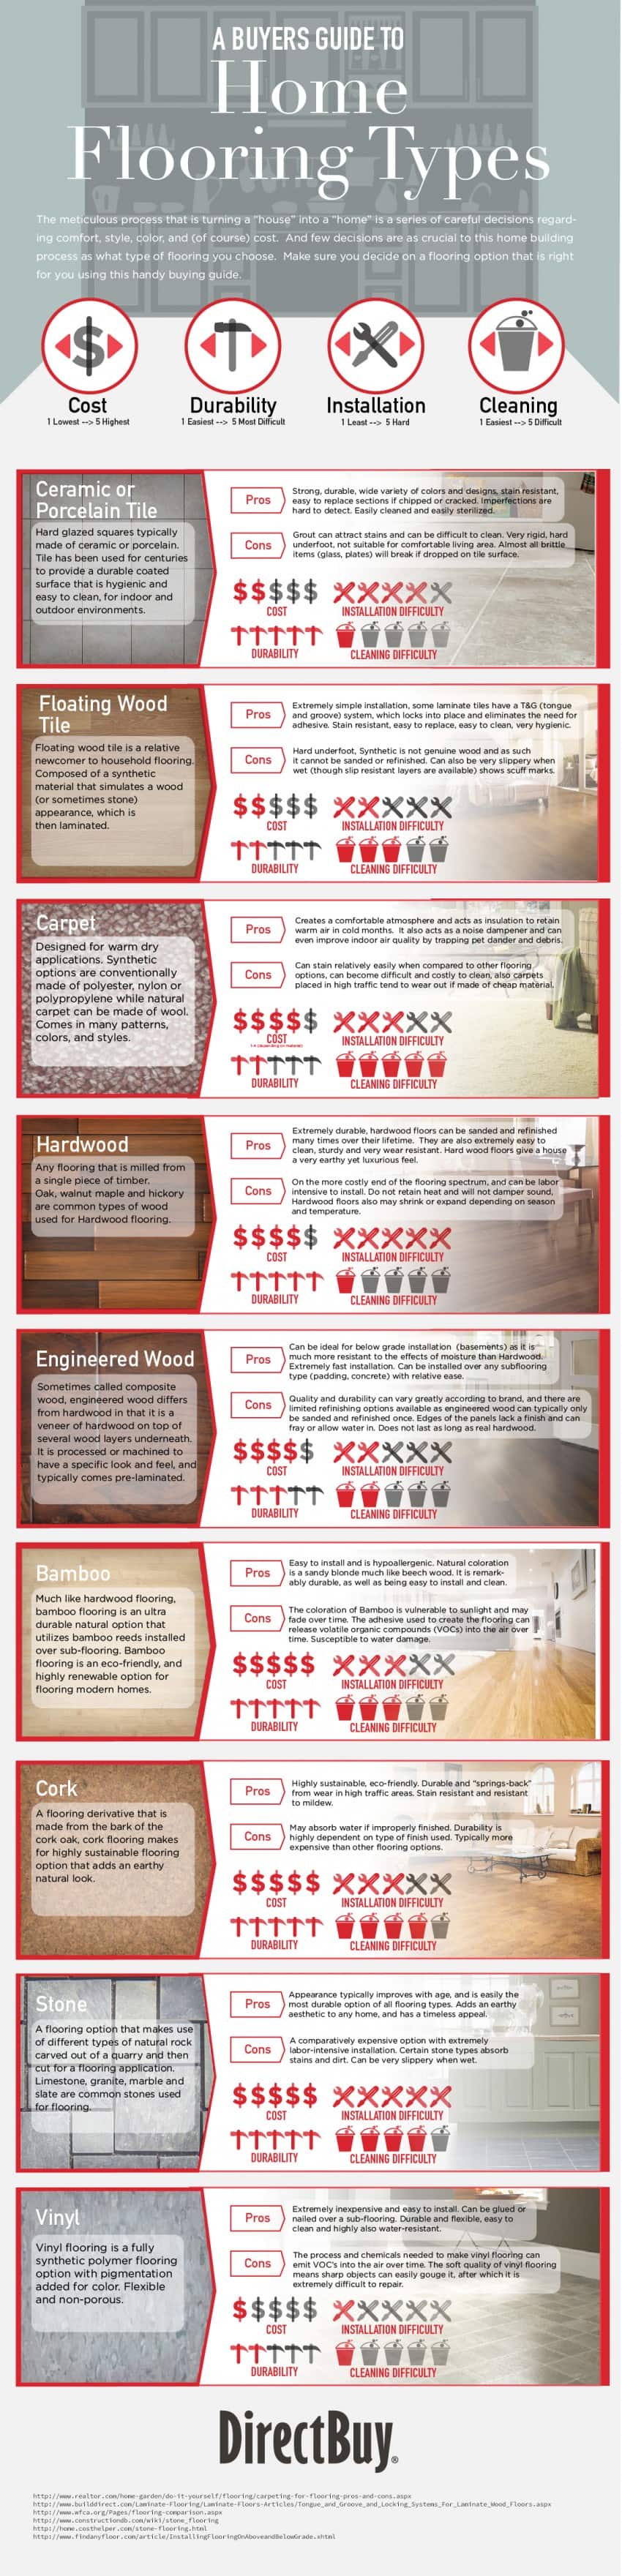
The first infographic in our series deals with the base of every house, the floor. It features 9 different material used in floors and discusses the pros and cons of each one together with 4 properties of each (cost, durability, installation difficulty and cleaning difficulty).
Let’s see a summary of the important points for the various flooring types described in the infographic to help you make a good buying decision:
– Ceramic or Porcelain Tile Flooring
PROS: Strong and Durable. Easy cleaning.
CONS: Very rigid and hard underfoot. Not very comfortable.
COST: 2/5
DURABILITY: 5/5
INSTALLATION DIFFICULTY: 4/5
CLEANING DIFFICULTY: 1/5
– Floating Wood Tile Flooring (Synthetic laminated material)
PROS: Simple installation, easy to replace, easy to clean.
CONS: Hard underfoot. Not genuine wood.
COST: 2/5
DURABILITY: 2/5
INSTALLATION DIFFICULTY: 2/5
CLEANING DIFFICULTY: 3/5
– Carpet Flooring
PROS: Comfortable and keeps home warm.
CONS: Stains easily. Difficult and expensive to clean.
COST: 4/5
DURABILITY: 2/5
INSTALLATION DIFFICULTY: 3/5
CLEANING DIFFICULTY: 5/5
– Hardwood Flooring
PROS: Very durable, easy to clean, give the house a luxurious look.
CONS: Expensive, hard to install.
COST: 4/5
DURABILITY: 5/5
INSTALLATION DIFFICULTY: 5/5
CLEANING DIFFICULTY: 1/5
– Engineered Wood Flooring
PROS: Easy installation, resistant to moisture.
CONS: Quality and durability vary greatly depending to brand. Not very durable.
COST: 4/5
DURABILITY: 3/5
INSTALLATION DIFFICULTY: 2/5
CLEANING DIFFICULTY: 2/5
– Bamboo Flooring
PROS: Easy installation, extremely durable, hypoallergenic.
CONS: Color may fade over time. Susceptible to water damage.
COST: 5/5
DURABILITY: 5/5
INSTALLATION DIFFICULTY: 3/5
CLEANING DIFFICULTY: 3/5
– Cork Flooring
PROS: Highly durable, eco-friendly, stain resistant.
CONS: Expensive, may absorb water if improperly finished.
COST: 5/5
DURABILITY: 5/5
INSTALLATION DIFFICULTY: 3/5
CLEANING DIFFICULTY: 4/5
– Stone Flooring
PROS: The most durable from all options, adds an earthy appeal.
CONS: Expensive, very hard to install, can be very slippery when wet.
COST: 5/5
DURABILITY: 5/5
INSTALLATION DIFFICULTY: 5/5
CLEANING DIFFICULTY: 4/5
– Vinyl Flooring
PROS: The most inexpensive option, easy to install, flexible.
CONS: The materials used to manufacture vinyl can emit volatile organic compounds (VOCs) over time.
COST: 1/5
DURABILITY: 2/5
INSTALLATION DIFFICULTY: 1/5
CLEANING DIFFICULTY: 1/5
2) Dos and Don’ts of Interior Design

source: http://www.creativelydifferentblinds.com/
This infographic depicts 8 essential principles of home interior design in “Do” or “Don’t do” format. Nothing fancy here but if you follow these design principles it can help you avoid pitfalls when planning and executing your own space transformation.
In summary, the 8 design principles are:
- Use different textures (smooth, rough, shiny etc) in the design elements.
- Use accessories that will enrich the whole design idea.
- Before selecting a color for your space, get samples and actually try the color at home to see how it looks in its environment.
- A small piece of art (photograph, art picture, canvas etc) will be “lost” in a large bare wall. Do not hang small pieces on large empty walls.
- Do not overcrowd too many pieces in a space.
- For small rooms, enhance them with few large statement pieces of furniture.
- Don’t be afraid to experiment with trendy new styles, contemporary accessories that you find in a store etc.
- A floor plan of your space that you’re going to design and decorate will prove helpful when planning and purchasing stuff for your project.
3) Coloring your Home

source: http://www.design55online.co.uk/blog/2013/07/24/the-complete-interior-design-guide-to-colour/
Different colors evoke different emotions and psychological feelings on people according to studies. Although the psychology behind each color is not set on stone, interior designers suggest certain color and palettes that are most appropriate for each room.
Have a look at the infographic above to see the color options suggested for each room in the house. Also, summarizing the emotions evoked from each color, here are the most important ones:
- White evokes cleanliness and sanitation (use in laundry rooms for example).
- Rooms lit with blue spectrum light promote alertness.
- Views of foliage and green landscapes have been shown to reduce ADD in children.
- Red, Orange, Yellow: Increased heart rate, increased blood pressure, heavier respiration.
- Green, blue, purple: Reduced heart rate, lowered blood pressure, slowed respiration.
4) Top 5 Interior Design Styles
sources: http://www.homezada.com/ , https://www.exclusivemod.com/
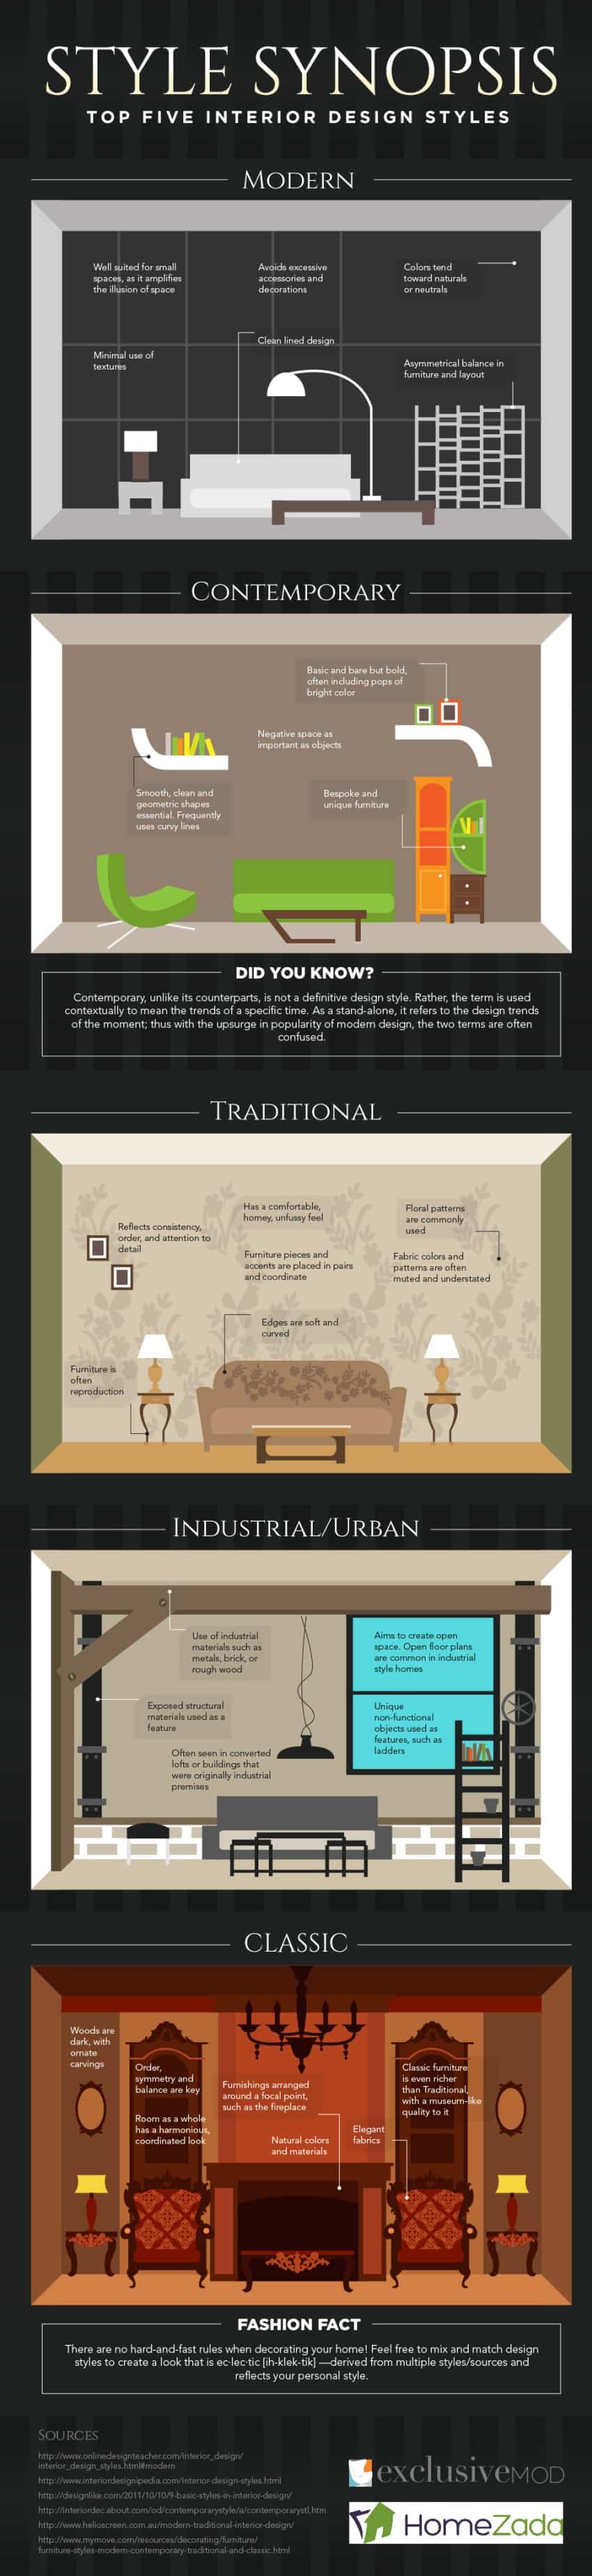
We often hear or read about the words “modern”, “contemporary”, “traditional” etc in home décor and interior design fields. But what do these words actually mean? The graphic above illustrates the top five interior design styles, their characteristics, how they compare, characteristics of their furniture etc.
Summary of each interior design style:
– MODERN
- Clean line design.
- Minimalist.
- Well suited for small spaces.
- Avoids excessive accessories and decorations.
- Asymmetrical balance in furniture.
– CONTEMPORARY
- Contemporary style is following the trends of the current time.
- Smooth, clean and geometric shapes.
- No clutter.
- Bespoke and unique furniture.
- Bold and bright color.
– TRADITIONAL
- Comfortable, homey, unfussy feel.
- Furniture and accents are placed in pairs.
- Reflects consistency, order and attention to detail.
- Edges are soft and curved.
- Floral patterns.
– INDUSTRIAL/URBAN
- Open floor plans.
- Unique, non-functional objects used as features.
- Use of industrial materials such as metal, brick, rough wood.
- Often used in converted lofts or buildings that were used as industrial places.
– CLASSIC
- Natural colors and materials.
- Dark woods with ornaments.
- Rich Classic furniture with museum-like quality.
- Order, symmetry and balance.
- Elegant fabrics.
5) Kitchen Layout Guide

source: http://www.kitchencabinetkings.com/kitchen-layout-infographic
“Kitchen Cabinet Kings” created this informative graphic depicting various kitchen layouts you can use for your own kitchen remodeling project. The infographic gives emphasis to the kitchen “work triangle” which keeps the three essential appliances within handy, unobstructed reach and allows efficient and easy food preparation. This “work triangle” in kitchens refers to the placement in a triangle position of the 3 key kitchen appliances, i.e the fridge, oven/hob, and the sink/dishwasher.
Here is a summary of the six kitchen layouts and their most important characteristics according to the graphic above:
– U-SHAPED KITCHEN
- Ideal for 2 cooks.
- Place the sink opposite or neat the cooking area.
- Floor area should be at least 8×8 feet.
– L-SHAPED KITCHEN
- Ideal for studio apartments.
- Use the longer area for meal preparation.
- Free-up counter space, install overhead cabinets.
- Avoid décor accessories as they make the area look cramped.
– ISLAND FLOOR PLAN
- Divides large kitchens into smaller and more efficient working areas.
- The island is the main element. Plan according to island’s main function.
- You can place chairs next to the island to make it the main social space in the kitchen or even to make it a dining table.
- Place pendant lights above the island.
– PENINSULA KITCHEN OR G-SHAPED LAYOUT
- Use peninsula as breakfast corner.
- Separate the prep, cooking and clean-up areas.
- Don’t break the kitchen triangle.
- Group tall appliances together.
– GALLEY KITCHEN LAYOUT
- Great space-saver layout.
- Keep refrigerator and sink together, put stove on the opposite side.
- Install enough lighting.
- Use pull-outs for storage.
- Opt for shelves instead of cabinets.
– ONE WALL KITCHEN
- Allows for efficient workflow.
- Place sink in between the refrigerator and stove.
- Cheapest kitchen layout from all.
- Add a kitchen island (if you have enough space) or maybe a dining table.
- Use additional storage as standalone furniture.
6) Kitchen Space Design
source: https://www.fix.com/blog/kitchen-design-best-practices/
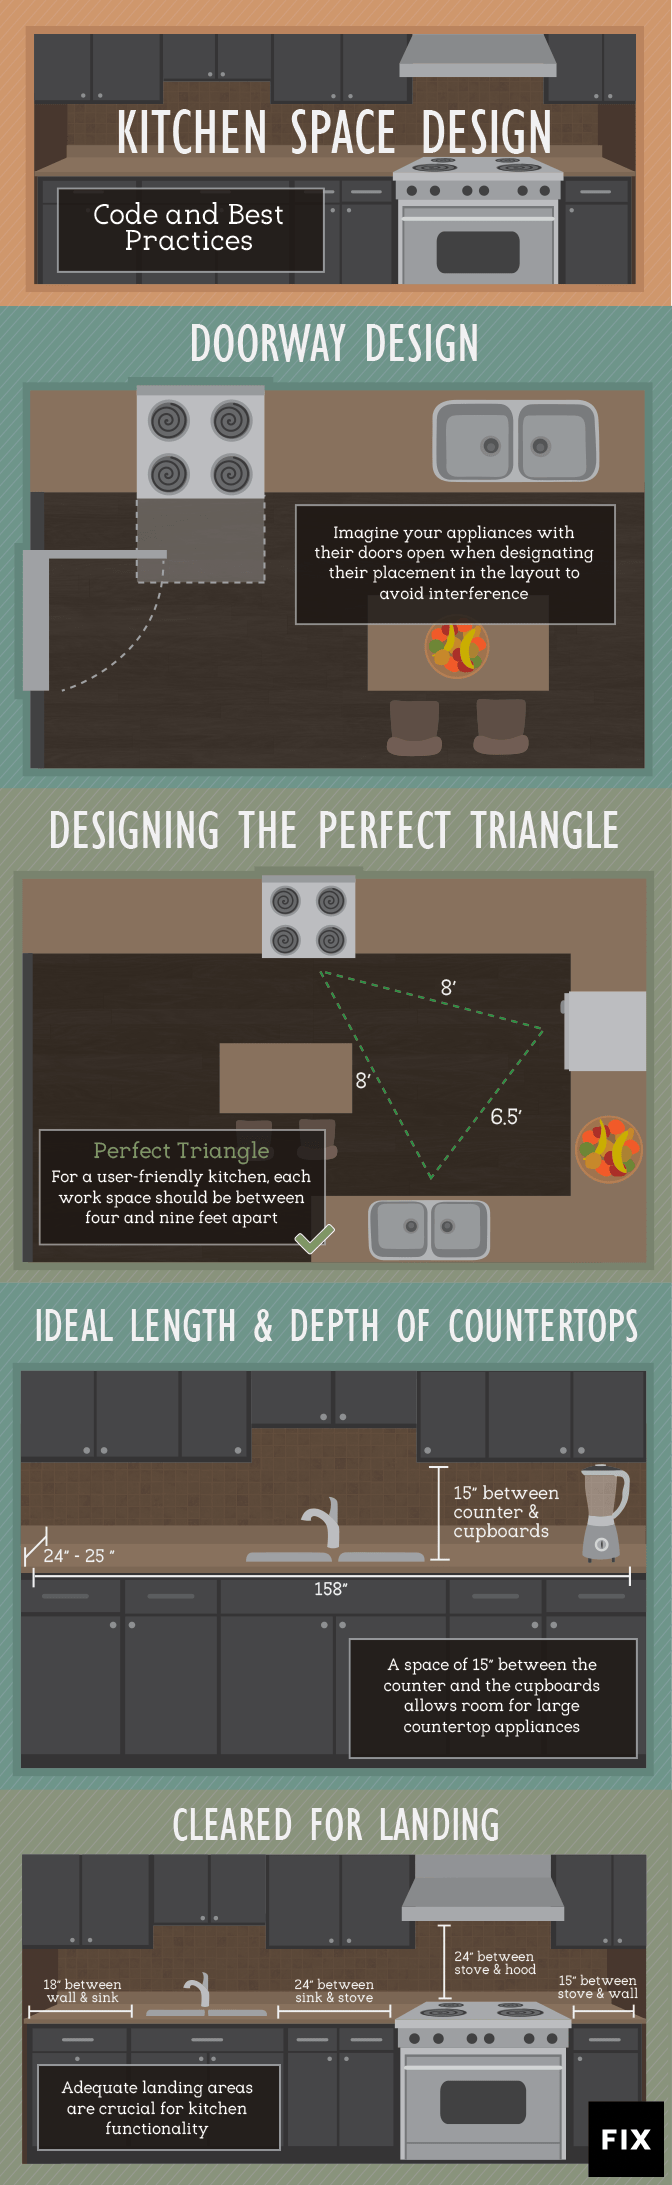
This excellent infographic is provided by fix.com (written by Lee Wallender) and showcases some best practices of kitchen space design. This is somewhat similar to the previous infographic but instead of discussing different layout designs, here we have some general space design principles that can be applied to all kitchen layouts.
Here are some important points from the graphic above:
- When thinking about the placement of your appliances, always imagine them with their doors fully open to avoid interference.
- Here we have again the “kitchen triangle” concept which guides the placement of the 3 important appliances (fridge, sink, stove) in a triangle position. For a perfect triangle, each workspace should be between 4 and 9 feet apart.
- A space of 15” between counter and cupboards, allows room for large countertop appliances.
- Adequate landing areas are crucial for kitchen functionality.
7) Tile Style Guide
source: http://www.drurydesigns.com/blog/interior-design-tile-style-guide
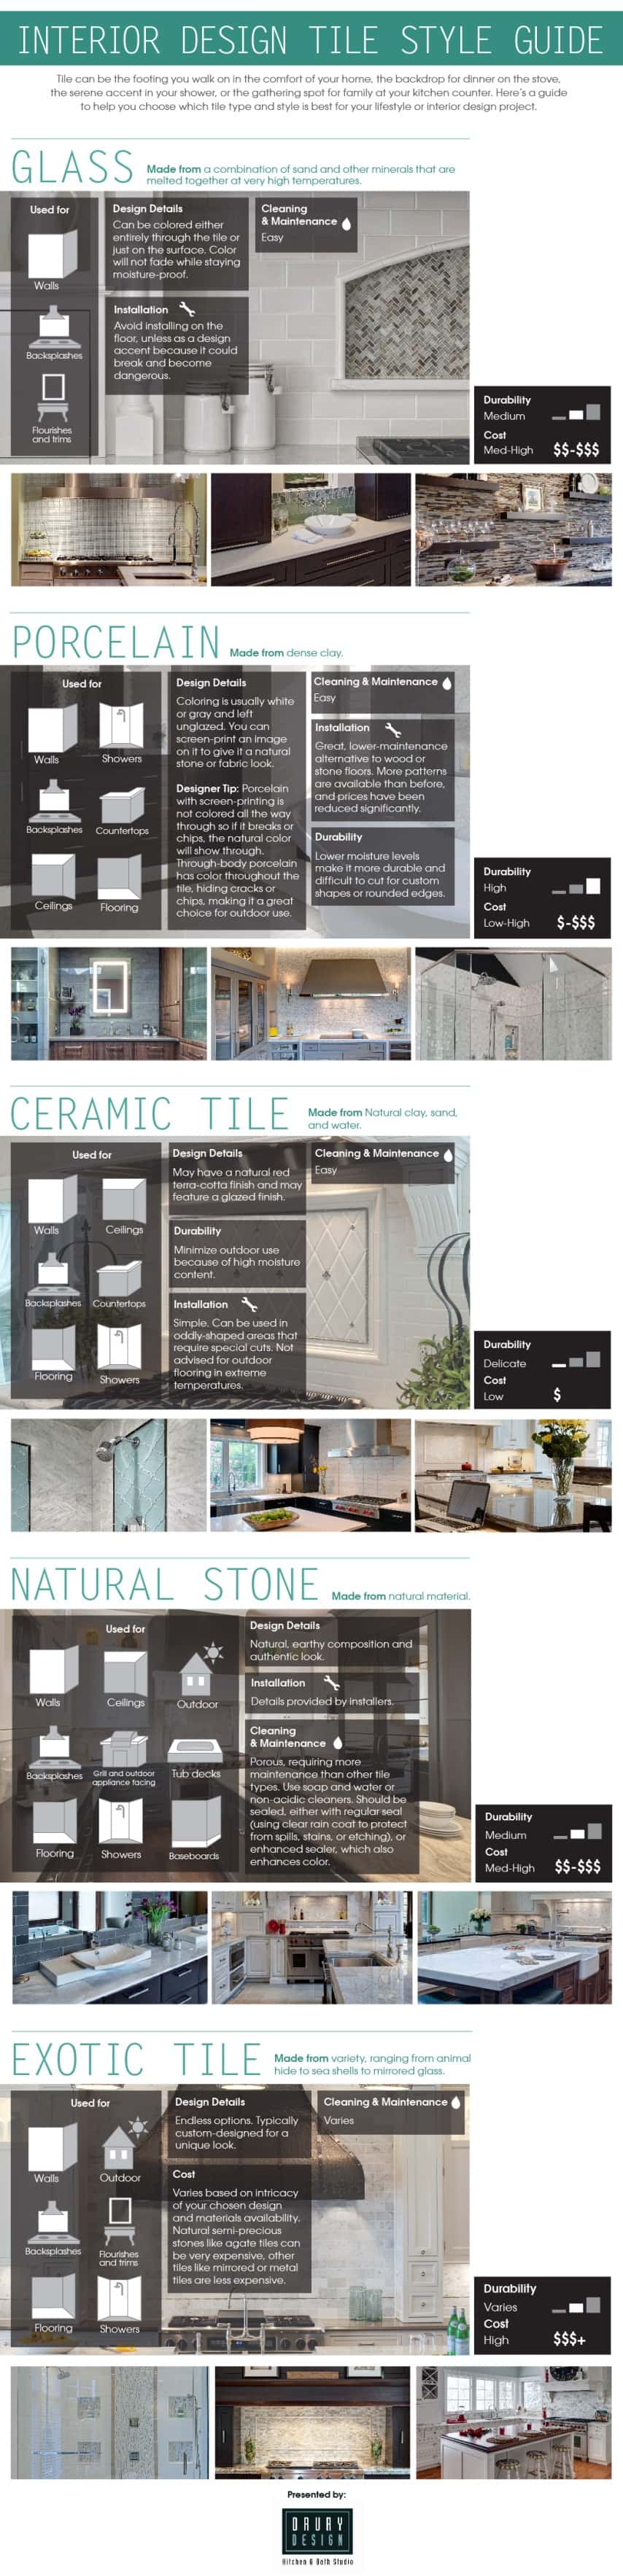
This infographic comes from Drury Designs and is about the various Tile styles you can use in your home. The graphic discusses five different tile material (glass, porcelain, ceramic, natural stone and exotic tile) for every budget, every area, and every desired aesthetic.
Here are the main important points from the infographic.
– GLASS TILE
- Durability: Medium
- Cost: Medium to High
- Cleaning and Maintenance: Easy
- Used on walls, backsplashes, flourishes and trims.
- Avoid installing on the floor.
– PORCELAIN TILE
- Durability: High
- Cost: Low to High
- Cleaning and Maintenance: Easy
- Used on walls, showers, backsplashes, countertops, ceiling, flooring.
- Lower maintenance alternative to wood or stone floors.
– CERAMIC TILE
- Durability: Low
- Cost: Low
- Cleaning and Maintenance: Easy
- Used on walls, ceilings, backsplashes, countertops, showers, flooring.
- Easy installation, not appropriate for outdoor use.
– NATURAL STONE
- Durability: Medium
- Cost: Medium to High
- Cleaning and Maintenance: Requires more maintenance because its porous.
- Used on walls, ceilings, outdoors, backsplashes, showers, flooring, tub decks, grill and outdoor appliance facing, baseboards.
- Needs experienced installer.
– EXOTIC TILE
- Durability: Varies
- Cost: High
- Cleaning and Maintenance: Varies
- Used on walls, outdoors, backsplashes, showers, flooring, flourishes and trims.
- Typically custom designed for unique look.
8) Standard dimensions of furniture
source: http://www.decoratour.com/cheat-sheet-for-standard-dimensions/ (courtesy of California Home + Design Sourcebook 2012)
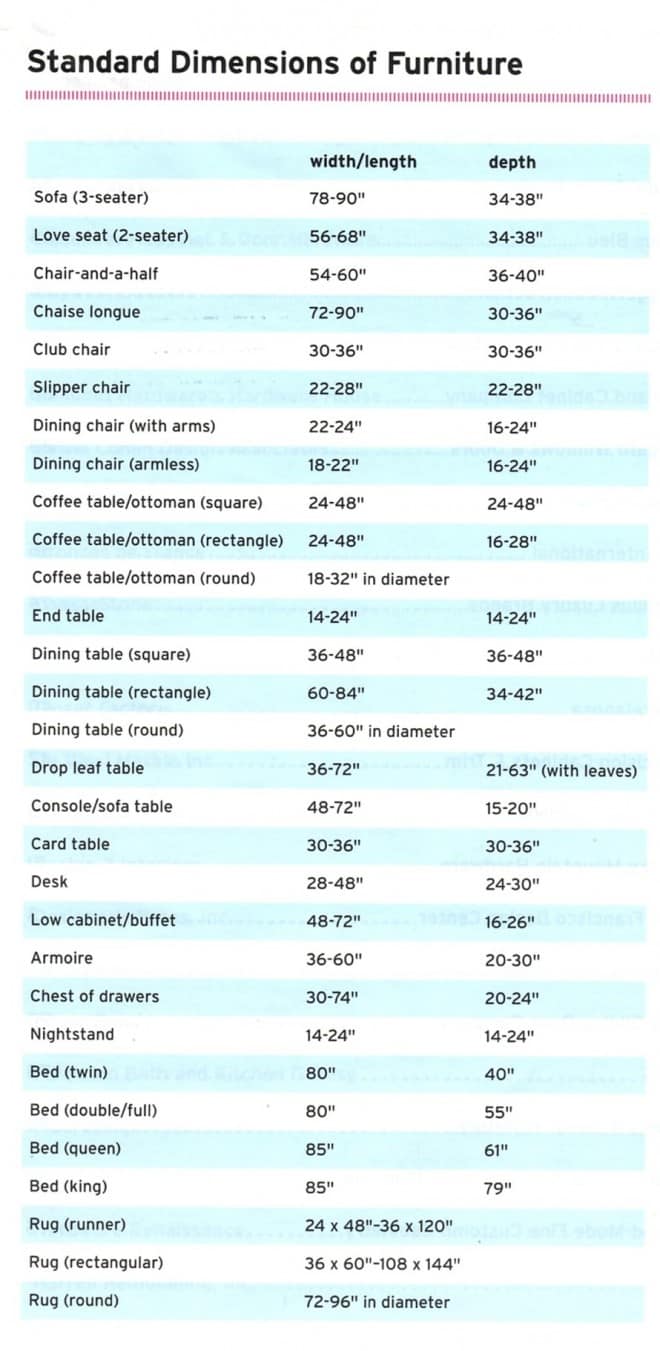
The infographic here is very useful for every home owner since it shows the standard dimensions of home furniture. We frequently have questions or doubts if a specific piece of furniture will fit in our space. Print out the above graphic or send it to your email address as it will be handy in such situations.
The table above is courtesy of California Home + Design Sourcebook 2012 and includes the standard dimensions of the most common furniture found in a home such as sofas, chairs, coffee tables, dining tables, beds (twin, double, queen, king etc), rug dimensions etc.
9) How to Feng Shui your Home
source: http://www.sheknows.com/home-and-gardening/articles/1050539/how-to-feng-shui-your-home-infographic
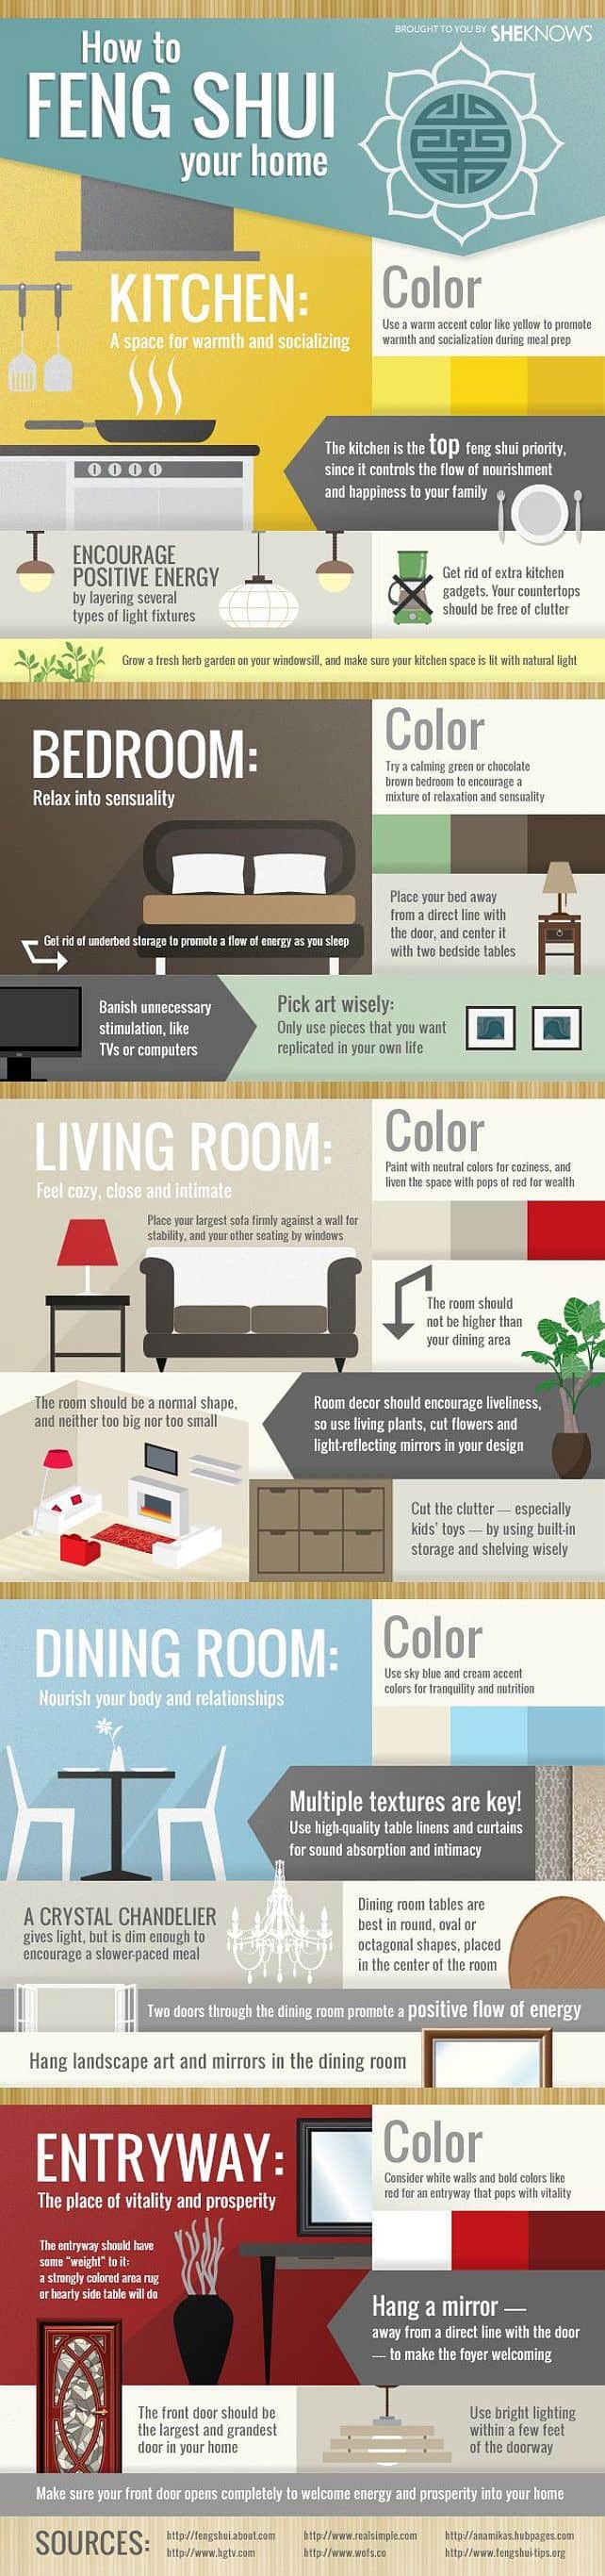
Here we have a different style of infographic, about Feng Shui decorating tips and guides for bringing better physical and emotional energy in your home. We know that it might not be possible to follow all tips suggested in the infographic. If that’s the case, start by infusing your home with natural light and clearing out your excess clutter. This will be a great start for good energy and health in your personal space.
Summarizing the graphic above, here are the main ideas and tips you need to know about Feng Shui for your home:
-KITCHEN
- Your kitchen is the top priority for feng shui since it controls the flow of happiness to your family.
- Use a warm accent color in the kitchen (such as yellow) to promote warmth and socialization when preparing a meal.
- Your kitchen countertop should be clutter free.
- Use different types of light fixtures in layers.
-BEDROOM
- Get rid of underbed storage to allow good flow of energy when you sleep.
- For color, try a calming green or chocolate brown.
- Place your bed away from a direct line with the door.
- Remove electronic appliances from bedroom such as TV, computer etc.
–LIVING ROOM
- Room décor should include living plants, cur flowers and light reflecting mirrors.
- The room should be a normal shape and neither too big or too small.
- Use neutral colors for a cozy atmosphere.
- Remove clutter such as kids toys etc by using storage and shelving.
-DINING ROOM
- Use multiple textures.
- Use a crystal chandelier.
- Best table shapes for dining room are round, oval or octagonal, placed in the center of the room.
- Hang landscape art and mirrors.
-ENTRYWAY (FOYER)
- Hang a mirror (not in direct line with the door).
- The front door should be the largest of the house.
- Consider white walls and bold colors (like red) in the entryway.
- Use bright lighting within a few feet from the doorway.
10) Bathroom Layout Guide
source: www.glasstilestore.com
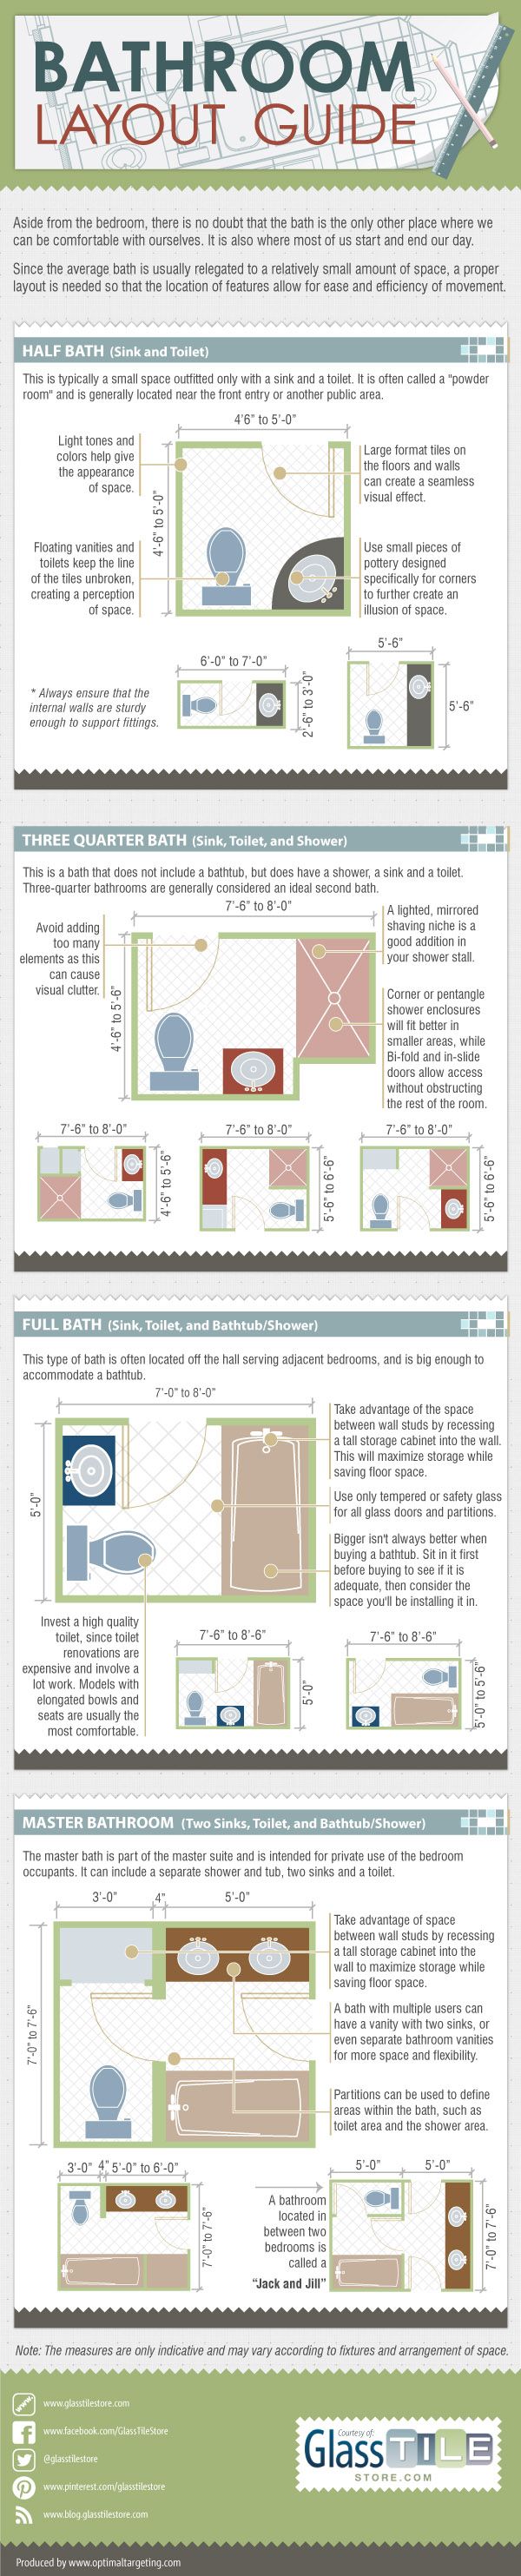
Here we have a guide for 4 different bathroom sizes and their layouts. It provides tips and suggestions for each one for ease and efficiency of movement.
-HALF BATH
- The half-bath size includes only a sink and toilet and is usually located near the front entry or other public area. It is a guest bath and we sometimes call it “powder room”. The infographic shows 3 different layouts with their dimensions.
- Use light color and tones to give the appearance of larger space.
- Use large format tiles on the floor and wall.
- Use small pieces of pottery designed for corners.
-THREE QUARTER BATH
- This includes sink, toilet and shower but without a bathtub.
- These bathrooms are used as second bath space.
- Corner or pentacle shower enclosures will fit better in smaller areas. Bi-fold and in-slide doors allow access without obstructing the rest of the room.
- A lighted – mirrored shaving niche is a good addition in your shower stall.
-FULL BATH
- The full bath includes a sink, toilet and bathtub. This is usually the main bathroom of the house.
- Invest in high quality toilet since toilet renovations are expensive.
- Take advantage of the space between wall studs by recessing a tall storage cabinet into the wall. This will maximize storage.
- Use only tempered or safety glass for partitions and glass doors.
- Purchase the right size of bathtub that will be both comfortable for you to sit in and also will fit perfectly in your space.
-MASTER BATHROOM
- Includes two sinks (for the couple using it), toilet and bathtub/shower.
- A master bathroom is usually found in big homes with a master bedroom and is intended for private use from the master bedroom couple.
- You can incorporate a vanity with two sinks or even separate bathroom vanities for even more space.
- Partitions can be used within the bathroom area to isolate parts of the master bathroom (such as toilet area and bathtub area).
11) Living Room layout guide

source: http://www.furnishedup.com/blog/2014/02/living-room-layout-guide/
Although the living room decoration is unique to every homeowner’s personality and personal style, there are some common living room layouts that are frequently found in many interior designs. Your furniture placement and layout is important for any living space. For example, you can highlight your room’s focal point by arranging your furniture so that they face the focal point of the room (which can be an entertainment system, a shelf with collection of books, a piece of art etc).
The infographic above, provided by “Furnished Up”, offers several useful tips on living room layouts. Here is the summary of the five typical floor plans for living rooms:
-EMPHASIS ON FOCAL POINT
- A focal-point of the room can be anything you want (TV, fireplace, bookshelf etc) but in most cases it is the TV system.
- The furniture are placed in such a way as to everyone sitting on them will be facing the focal point.
-EMPHASIS ON CONVERSATION
- Furniture are arranged in a circular grouping to facilitate conversation.
- This is a great layout if you are hosting parties.
-KIDS FRIENDLY LAYOUT
- A “play zone” area exists in this floor plan layout.
- You can create a partition between the kid’s area and the adult’s area by using a table or sofa as a natural boundary.
- Use a separate storage furniture to accommodate all kids’ toys.
-EMPHASIS ON VISUAL BALANCE
- This floor layout gives emphasis on balanced placement of furniture in the living room as shown in the infographic above.
-EMPHASIS ON ALIGNMENT OR SYMMETRY
- Use pairs of furniture and décor for a symmetric layout.
- Symmetrical look works best for formal rooms.
12) Dining Tables Seating Capacities
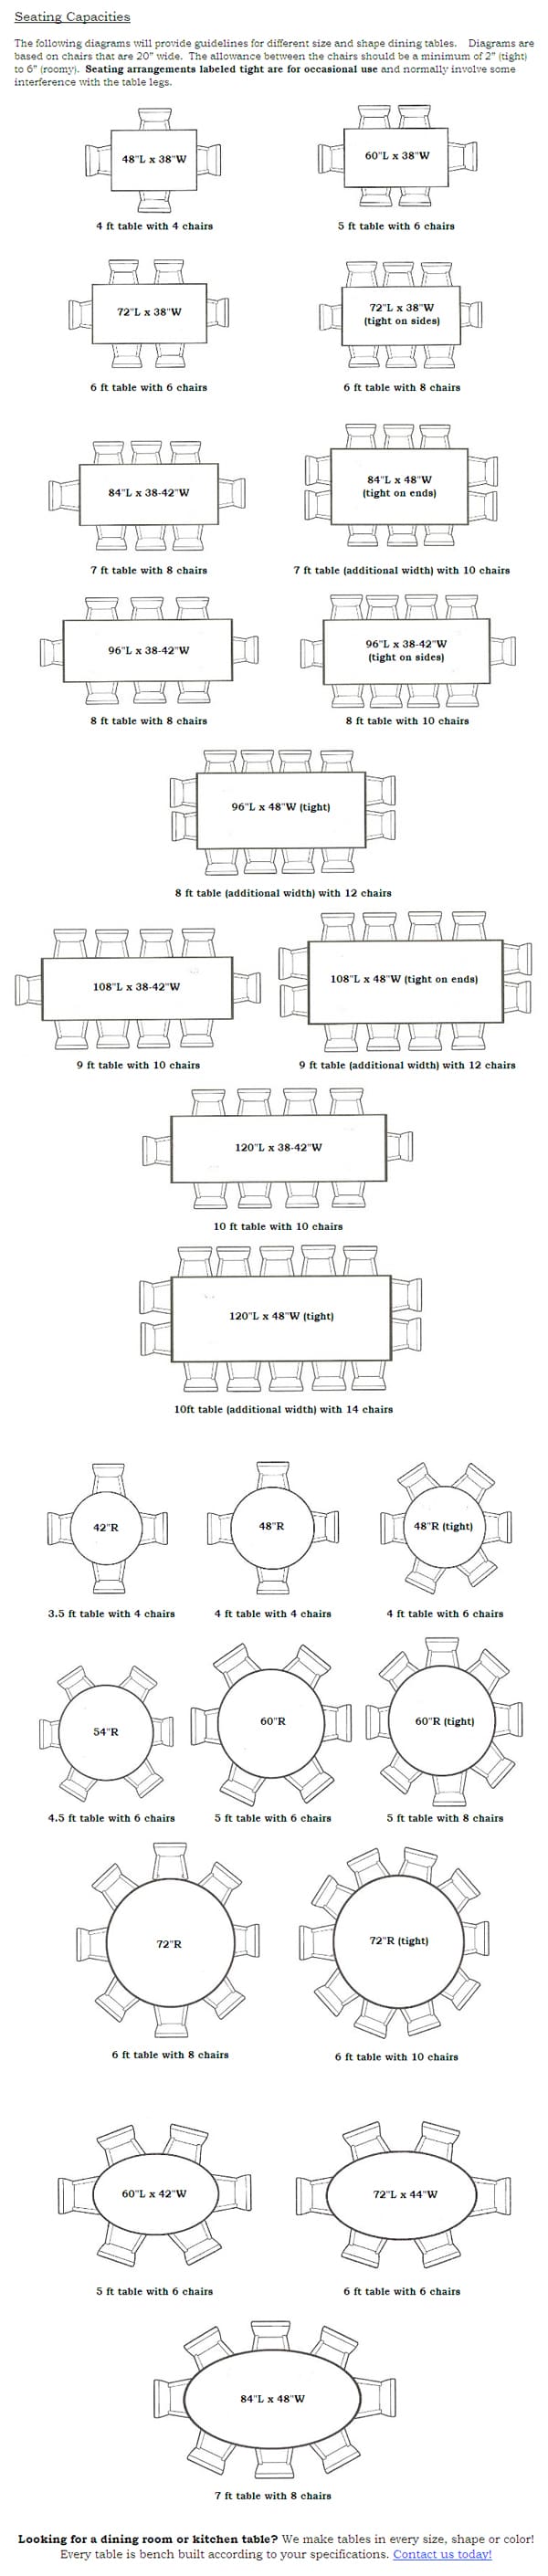
source: http://cottagehomefurniture.com/
The diagrams above are courtesy of “Cottage Home Furniture” and provide dimension guidelines for different size and shape of dining tables. The graphic includes rectangular, circular and oval shapes of tables. As noted on the diagram, seating arrangements labeled as tight are for temporary occasional use when you need to accommodate extra people on the same table.
13) Saving Money with Green Upgrades

source: http://www.moneysupermarket.com/
This is an infographic that can put money in your pockets! Actually, it will help you save money by implementing some upgrades that will not only help the environment but can also save you money. Although the money shown in savings are in British Pounds, the green upgrade concepts illustrated in the graphic above can be applied in any country.
Let’s see a summary of the Green Upgrades that you can implement in your own home for some excellent money savings:
- Using solar panels: Approximate Savings £645/year.
- Using a wood burner: savings of 10% on your gas bill.
- Using a wind turbine: Approximate Savings £200/year.
- Loft insulation: Approximate Savings £180/year. (costs around £300)
- Double glazing on windows: Approximate Savings £170/year. (costs around £5000)
- Cavity wall insulation: Approximate Savings £140/year. (costs around £450)
- Floor insulation: Approximate Savings £50/year. (costs around £300)
- Solid wall insulation: Approximate Savings £460/year. (costs around £7000)
- Air to water pump: Approximate Savings £700/year.
- Geothermal heat pump: Approximate Savings £700/year.
Some other important tips from the graphic above:
- Use distilled vinegar to clean the house (1 part vinegar, 1 part water).
- Use modern green washing machines which clean the clothes at lower temperatures.
- Reuse plastic bags.
- If your fridge is older than 10 years old, consider replacing with a modern one which consumes less energy.
- Line Dry your laundry. Using the wind to dry your laundry is an excellent savings tip.
- Aim for Grocery home delivery. You can save money on fuel if you live far away from a grocery store.
- Buy second hand furniture to save a fortune. Also, you will stop furniture from filling up land fields. Use sites such as Ebay, Gumtree or Freecycle to find used furniture in excellent condition.
14) Lighting size and placement guide
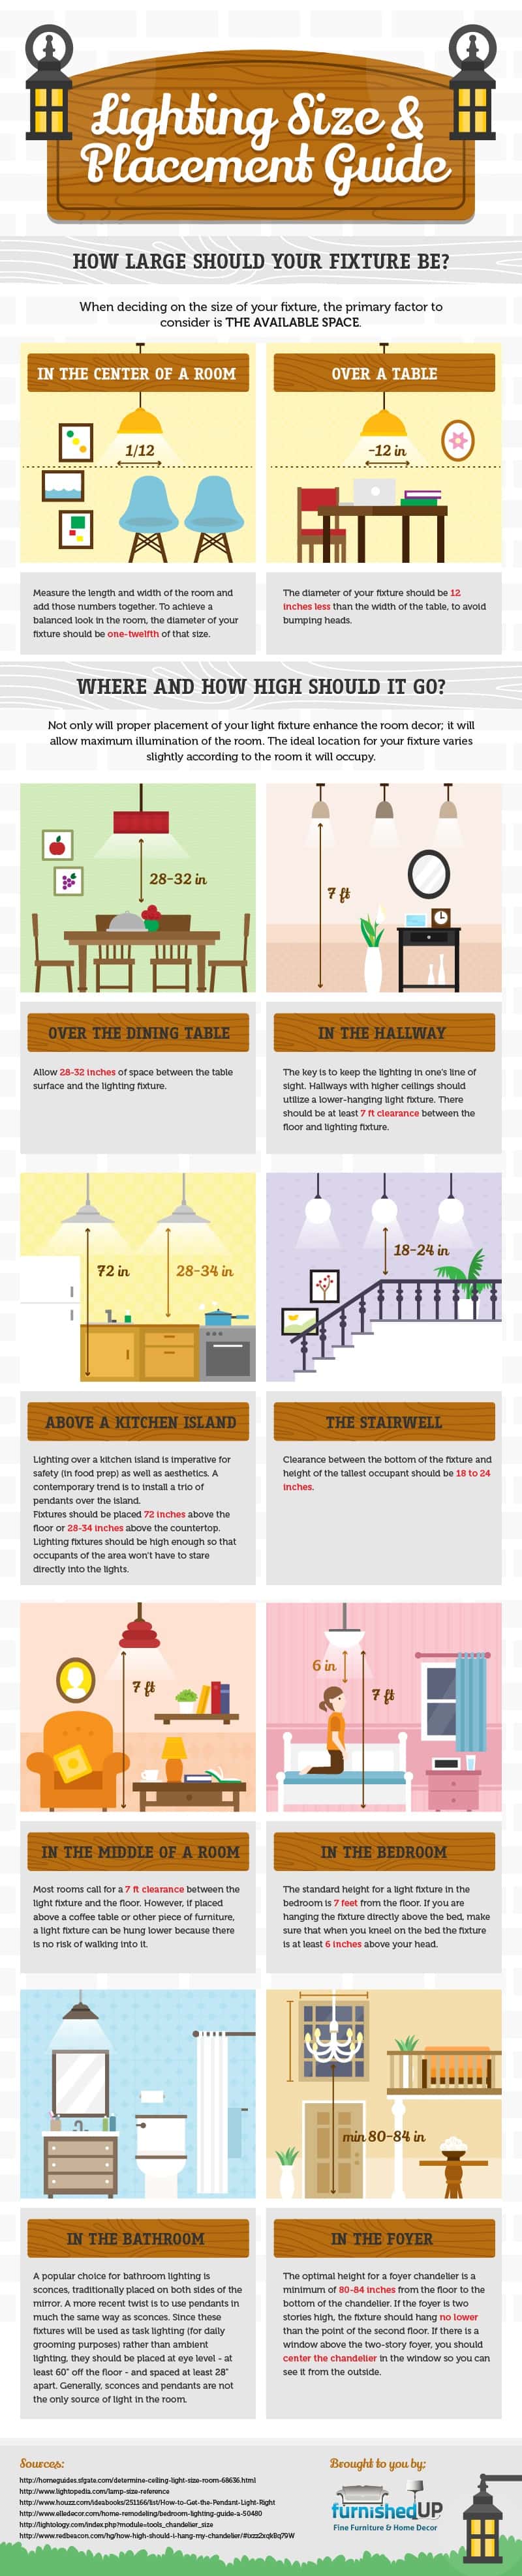
source: http://www.furnishedup.com/blog/2014/07/lighting-placement-guide/
Here we have an infographic about lighting fixtures size and placement guide. Proper placement of your light fixtures will enhance both the illumination in the room and the room décor as well. Also, in some cases, proper lighting size will help to avoid accidents (e.g bumping heads above the table).
For each area in the house, there are some best practices regarding placement and positioning of lights. Here is the summary of the infographic above:
-SIZE OF THE LIGHT FIXTURE
- For the center of the room: Add the width and length of the room. The diameter of the light fixture should be one-twelfth of that size.
- Over a table: The diameter of the light fixture should be 12 inches less than the width of the table to avoid bumping your head on the lamp.
-HEIGHT AND PLACEMENT OF LIGHTS
- Over the dining Table: Place the fixture 28-32 inches above the table.
- In the Hallway: There should be at least 7 feet clearance between the floor and light.
- Above a kitchen island: Fixtures should be placed 72 inches above the floor or 28-34 inches above the countertop.
- On the staircase: Allow 18 to 24 inches between the bottom of the fixture and the height of the tallest person in the house.
- In the middle of a room: 7 feet height from the floor.
- In the bedroom: 7 feet from the floor. If the fixture is above a bed, make sure you allow 6 inches above your head when you kneel on the bed.
- In the bathroom: If you install pendants as task lighting on both sides of the mirror, place them at eye level (around 60 inches from the floor).
- In the foyer (entryway): The optimal height of a chandelier in the foyer is minimum of 80-84 inches from the floor to the bottom of the chandelier.
15) Home measurements cheat sheet

source: http://www.househunt.com/news-realestate/home-measurements-cheat-sheet-infographic/
Print out this cheat sheet which illustrates the ideal measurements for almost anything in your house. Some important measurements you will find include ideal distance from TV, ideal width of food prep counter, microwave height, space between chairs and tables, ideal height of sink and towel rack, door width in bedrooms, dresser drawers space and much more.
16) Pick the right kitchen faucet for you
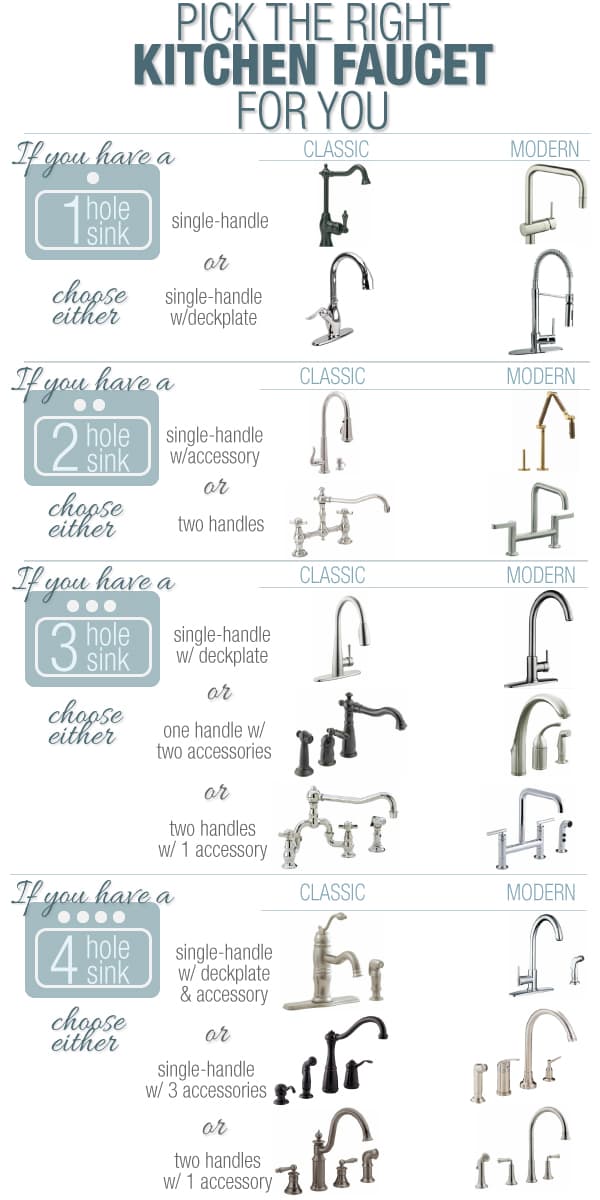
source: http://blog.homedepot.com/how-to-choose-the-right-kitchen-faucet/
This infographic is provided by “Home Depot” and shows the faucet options you have according to the type of sink in your kitchen. Both classic and modern look faucets are illustrated for you to choose the type you prefer.
17) What you need to know about Kitchen Design
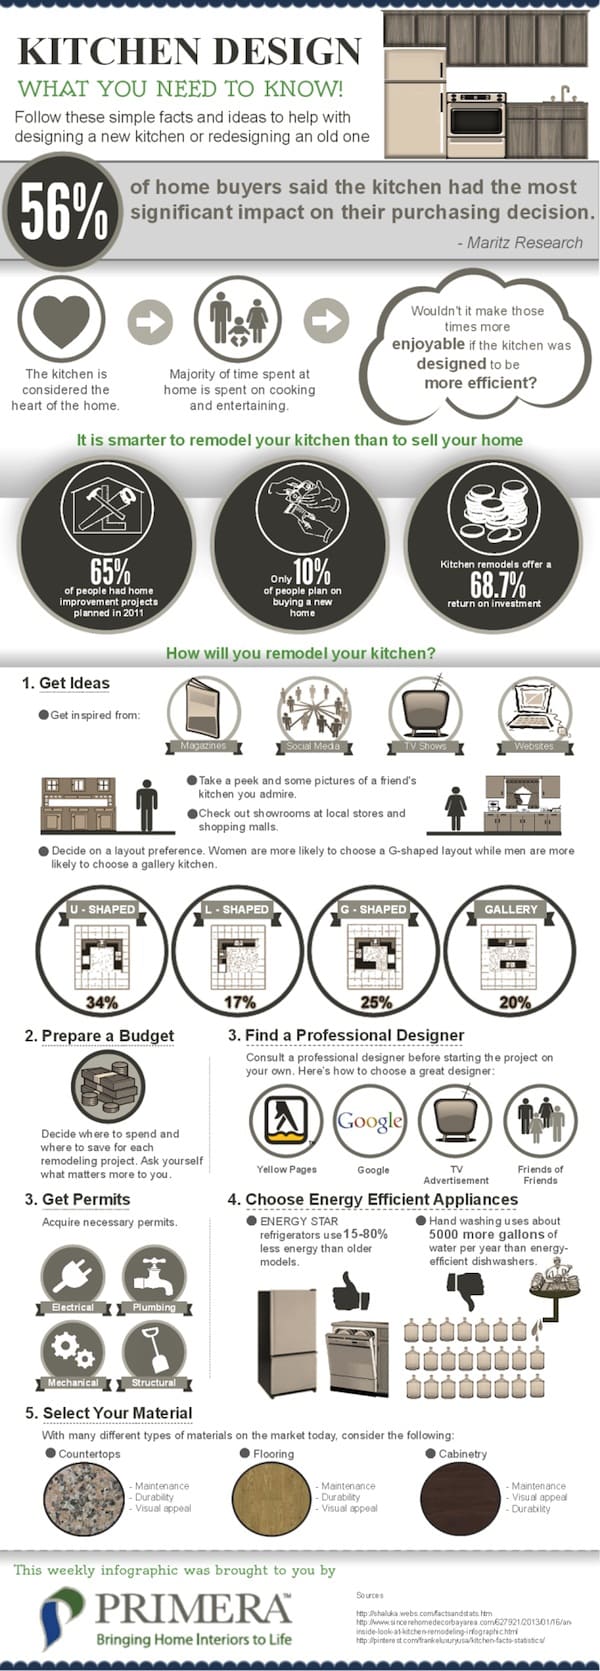
source: http://primera.net/
Considering the fact that the kitchen has one of the highest returns on investment and also that 56% of home-buyers said that the kitchen had the most significant impact on their purchasing decision, it’s important to learn a few vital ideas and suggestions about kitchen design.
The infographic here (provided by Primera Interiors) offers some thoughtful and useful information, tips and guides about kitchen design.
Here is a summary of some important points from the graphic:
- It is smarter to remodel your kitchen first before selling your home.
- Kitchen remodels offer a 68.7% return on investment.
- Get ideas for kitchen layouts and designs from magazines, websites, local showrooms etc.
- Decide on a floor plan layout preference between U-Shaped kitchen, G-Shaped, L-Shaped or Gallery kitchen layout.
- Women usually prefer G-Shaped kitchens while men prefer Gallery layout kitchen.
- Ask yourself what matters most to you in order to decide about where to spend your budget in your kitchen design project.
- Find and consult a professional interior designer before starting your project on your own.
- Acquire the necessary electrical, plumbing, mechanical, and structural permits.
- Choose energy efficient appliances (fridge, washing machine etc).
- Select carefully the materials for countertops, cabinets, flooring etc.
18) Pergolas-Everything you need to know
source: http://www.ricksfencing.com/
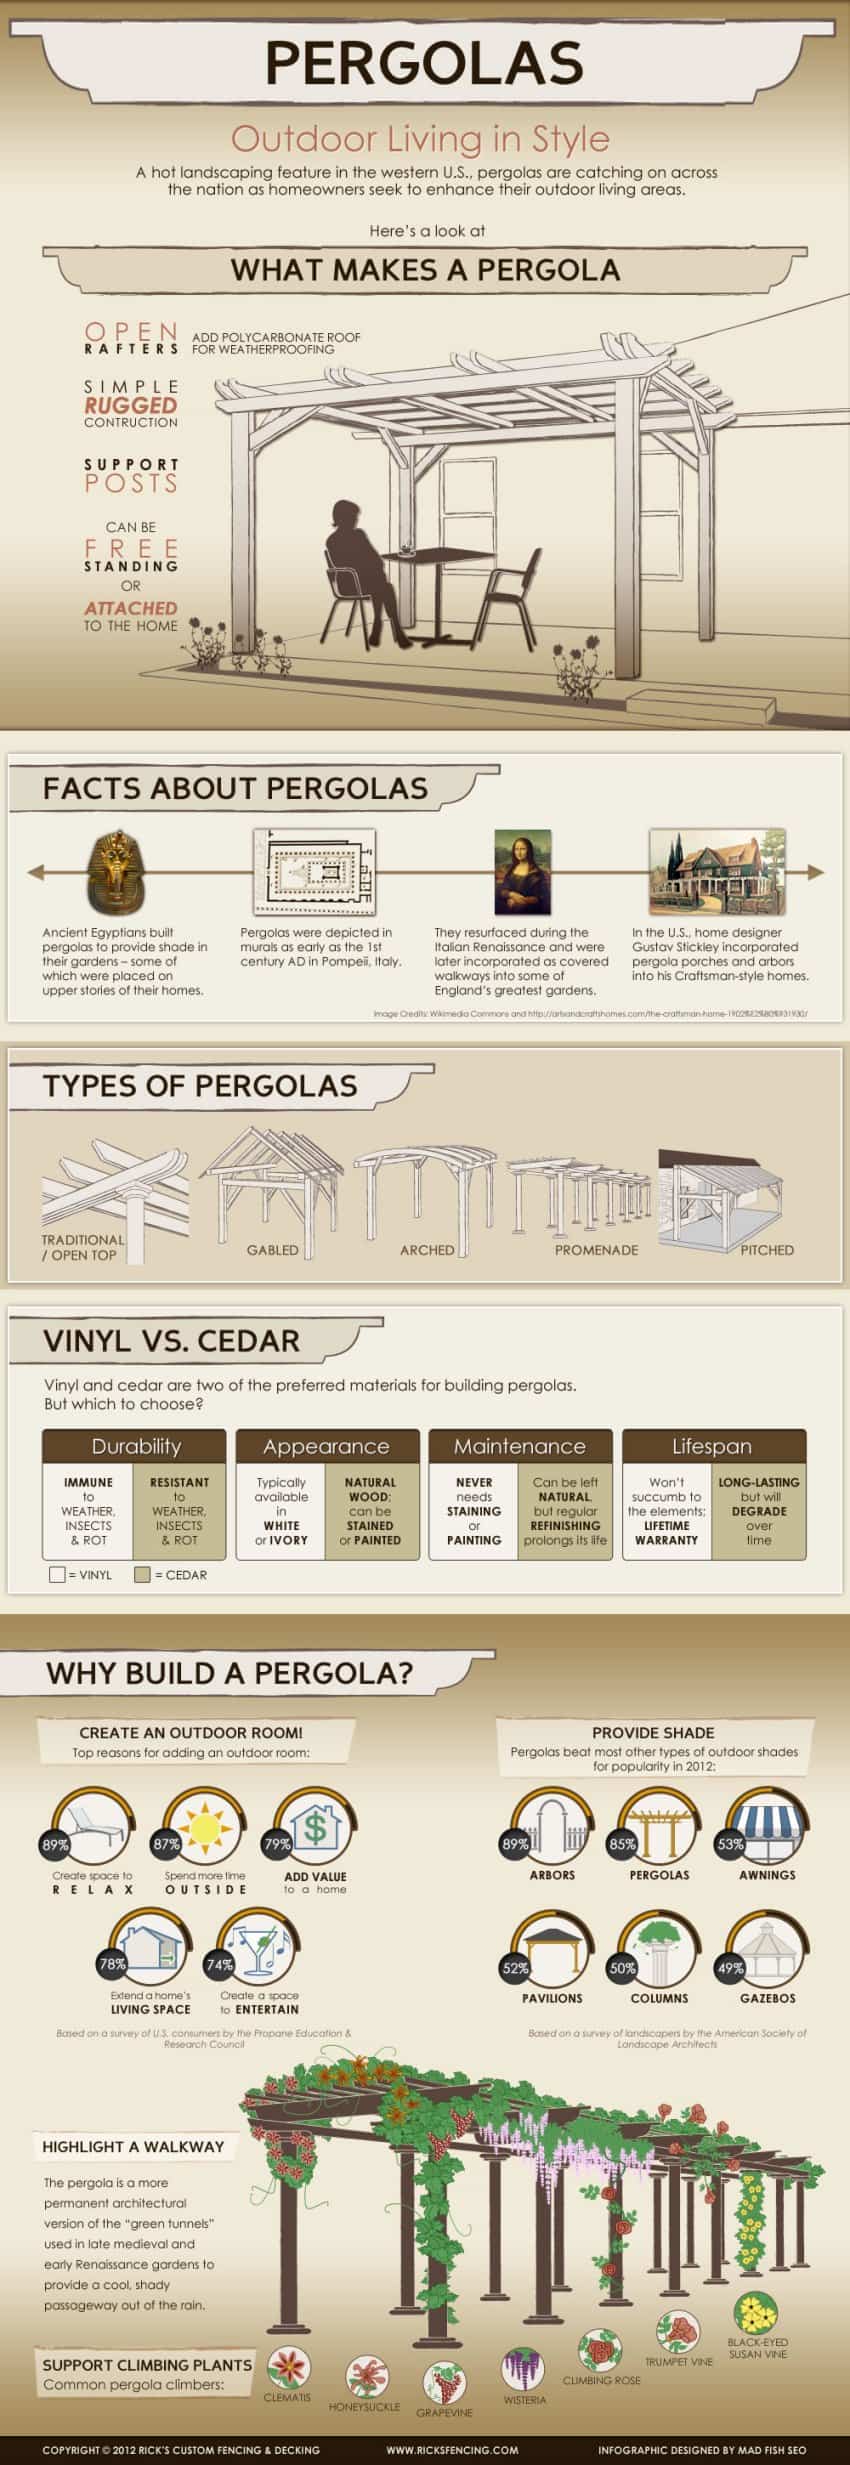
This is an informative diagram (courtesy of ricksfencing.com) about pergolas (types, materials, usage etc). Pergolas are a great outdoor feature that can add style and shade to your backyard or garden. They can be free-standing or attached to your home and are a great relaxation spot for spending time with friends and family.
Let’s see some information about pergolas from the infographic above:
- We have traditional/open-top pergolas, gabled, arched, promenade or pitched types.
- The two preferred materials used for building pergolas are vinyl and cedar wood.
- VINYL: Immune to weather and insects, typically available in white or ivory, never needs staining or painting, lifetime warranty.
- CEDAR WOOD: Resistant to weather, can be stained or painted, needs regular refinishing, will degrade over time.
- Reasons to build a pergola:
- Create an outdoor room.
- Provide Shade.
- Highlight a walkway.
- Support climbing plants.
19) Solid vs Engineered Hardwood Flooring
source: http://www.cokerfloorsouthlake.com/blog/2014/september/solid-vs-engineered-hardwood-flooring-infographi.aspx
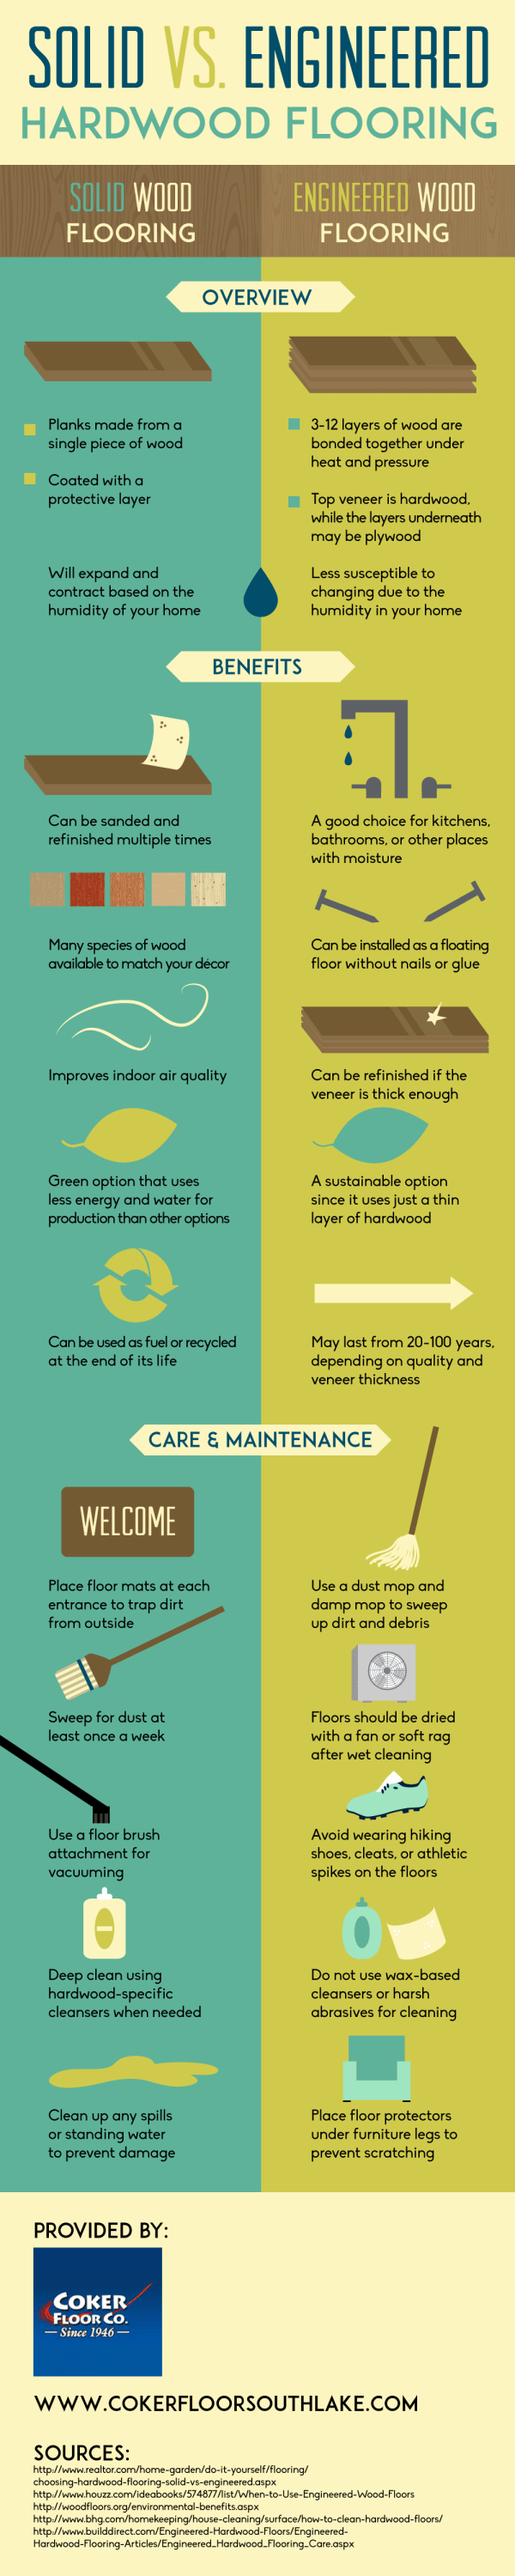
Wood flooring is great. It adds elegance and exquisite style to any home. This infographic from a flooring company (Coker floor co) compares two hardwood flooring types (solid wood flooring and engineered wood flooring) and gives tips for care and maintenance for each type.
-SOLID WOOD FLOORING
- Planks made from a single piece of wood and coated with a protective layer.
- Expands and contracts based on the humidity of the house.
- Can be sanded and refinished multiple times.
- Many species of wood available to match your style.
- Improves indoor air quality.
- Place floor mats at each entrance to trap dirt from outside.
- Sweep dust at least once a week.
- Use a floor brush attachment for vacuuming.
- Deep clean using hardwood-specific cleansers if needed.
- Clean up any spills of water to prevent damage.
-ENGINEERED WOOD FLOORING
- 3-12 layers of wood are bonded together under hear and pressure.
- Top veneer is hardwood while the layers underneath maybe plywood.
- Does not change that much due to humidity.
- A good choice for kitchens, bathrooms and other places with humidity.
- Can be installed as floating floor without nails and glue.
- Can be refinished if the veneer is thick enough.
- Use a dust mop and damp mop to sweep up dirt.
- Floors should be dried with a fan or soft rag after wet cleaning.
- Avoid wearing hiking shoes, cleats or athletic shoes with spikes.
- Do not use wax-based cleansers or harsh abrasives for cleaning.
- Place floor protectors under furniture legs.
20) Living Large in Small Spaces
sources: http://inhabitat.com/infographic-how-to-make-the-most-of-a-tiny-micro-apartment/
http://www.forrent.com/
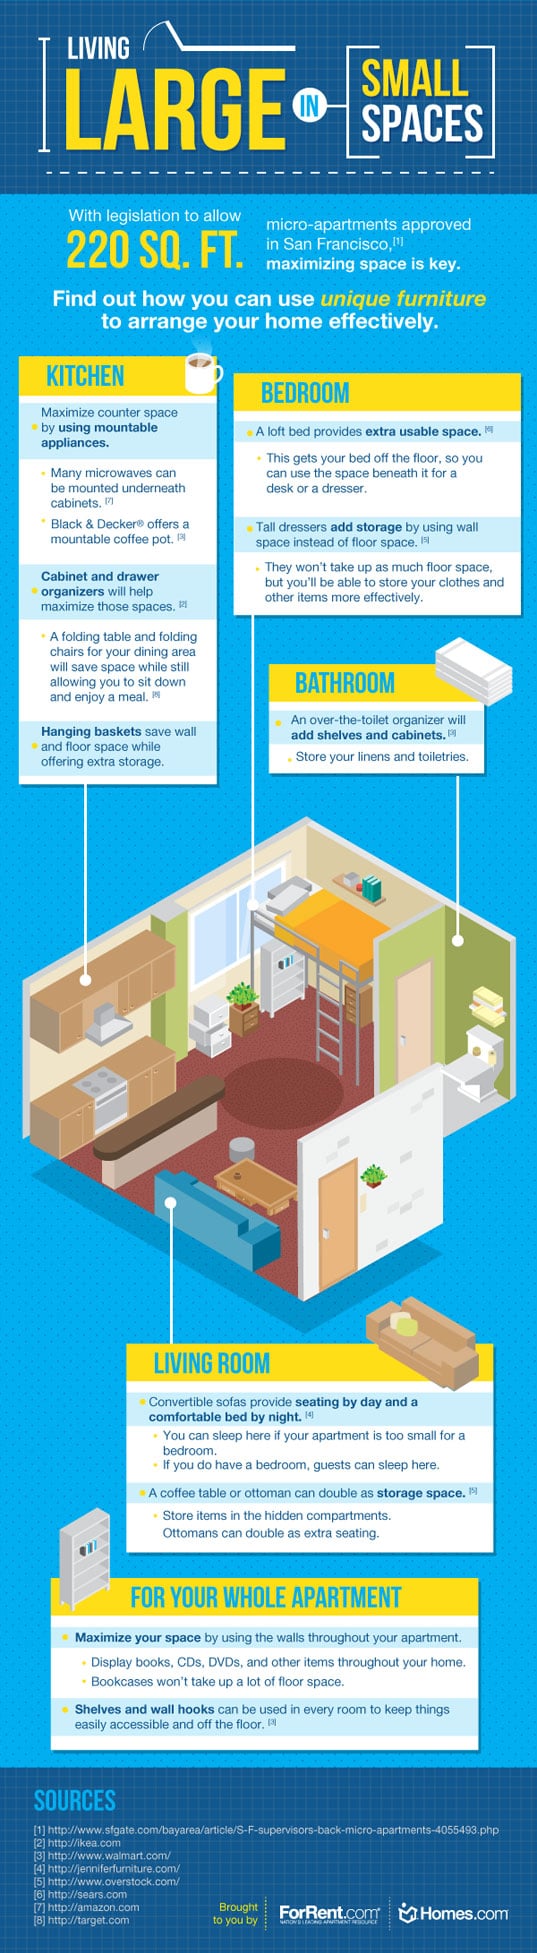
Tiny homes and micro apartments are on the rise. These are usually small spaces under 300 square feet and are aimed for young singles that just want a small room to sleep and take a shower. “ForRent” and “Inhabitat” published a very nice infographic showing ideas to accommodate yourself in a micro-space as efficient and comfortable as possible.
Here are some important tips from the graphic above for each room of the house.
-KITCHEN
- Use mountable appliances to maximize counter space. For example you can use a mountable microwave underneath the cabinet.
- Cabinet and drawer organizers are helpful to maximize those spaces. For example, use a folding table and folding chairs for the dining space.
- Hanging baskets save wall and floor space.
-BEDROOM
- A loft bed provides extra usable space.
- Tall dressers add storage and do not consume floor area.
-BATHROOM
- Install an over-the-toilet organizer to store your towels.
-LIVING ROOM
- Use a convertible sofa which becomes a bed as well.
- Store items in hidden compartments in the furniture.
-FOR THE WHOLE APARTMENT
- Use the walls as much as possible to save floor space.
- Shelves and wall hooks can be used in every room to maximize wall usage instead of floor usage.
21) How to make any room look bigger

sources: http://inhabitat.com/infographic-how-to-make-a-small-space-look-bigger/
http://www.anglianhome.co.uk/goodtobehome/room-inspiration/how-to-make-a-room-look-bigger-infographic/
This infographic is related to the previous one about living in small tiny homes. Although your personal room or the whole house might be restricted in terms of size, there are some techniques and tricks that you can use to create the illusion of a bigger space.
Let’s summarize the most important tips and suggestions offered in the diagram above:
- Place a large single mirror in the room to make it look double its size.
- Keep window coverings open and invest in good lighting. A sufficiently lighted room will look bigger.
- Keep furniture off the floor and avoid sofas with skirts. This means using furniture raised on legs.
- Keep out the clutter from the room and try to tidy things up all the time. A cluttered room always looks smaller. A tidy room looks bigger.
- Place large items against walls and never block walkways. By opening up the center of the room, you make it look bigger.
- Store your books in floor-to-ceiling bookcases. By adding height to the room, it appears larger.
- Avoid rugs or wallpapers that have too many busy or fussy patterns.
- Paint the room in lighter colors and mix it up with accent pieces.
- Opt for small and space saving furniture.
- Install multi-functional and multipurpose furniture (e.g furniture that have also storage space into them) to lower the total number of pieces in the room.
22) How to display art in your home

source: made.com
After renovating your home or for a new built, the time has come to start thinking about the final touch to the décor. Artwork is one of the elements that add richness and style to any room. Knowing how to display and hang your artwork properly is essential to create a stylish gallery of art.
Follow the basic design principles in the infographic above to make sure you display your art perfectly on the walls.
-Art to Wall Ratio
- A guideline to use is: [wall width] x 0.57 = [ideal width of artwork]
- If you are hanging a group of art, treat the cluster as you would treat a single piece.
-Height of artwork
- The museum approach: The center of the art painting should be 145 cm from the floor.
- The intuition approach: Hang art in relation to what’s already in the room (furniture, doors, windows etc). Make sure they are at comfortable eye level.
- If hanging multiple pieces together, align the middles of the paintings and not the top or bottom.
-Working with your room
- SOFA: The artwork width should be 2/3 of the width of the sofa. Hang art 15-20cm above the sofa.
- FIREPLACE: The artwork width should be 2/3 of the width of the fireplace. Hang art 10-30cm above the fireplace.
- DINING ROOM: Hang art a little lower to have good eye site when seated.
- DOUBLE HEIGHT WALL: Hang art 7-10 cm higher than normal walls.
- STAIRCASE: Hang matching frames in a diagonal line and measure up from every third step.
-Proportions
- If the room is busy with a lot of things, opt for a large piece of art on the wall to create a focal point.
- For smaller pieces of art, do not hang them alone on big walls. Consider creating a cluster with multiple small frames together.
- Make sure there is space for people to step back and admire the artwork.
-Hanging Groups of Artwork
- It’s all about creating balance, either symmetrical or asymmetrical.
- Lay your pieces on the floor first to see how they look together.
- Another option is to tape craft paper (same size as the art you will hang) on the actual wall to see how it looks.
- Rearrange the grouped art frames as needed but first take pictures of the previous setting to compare.
23) Five Renovations that add value to your home
source: http://visual.ly/renovations-add-value-your-home
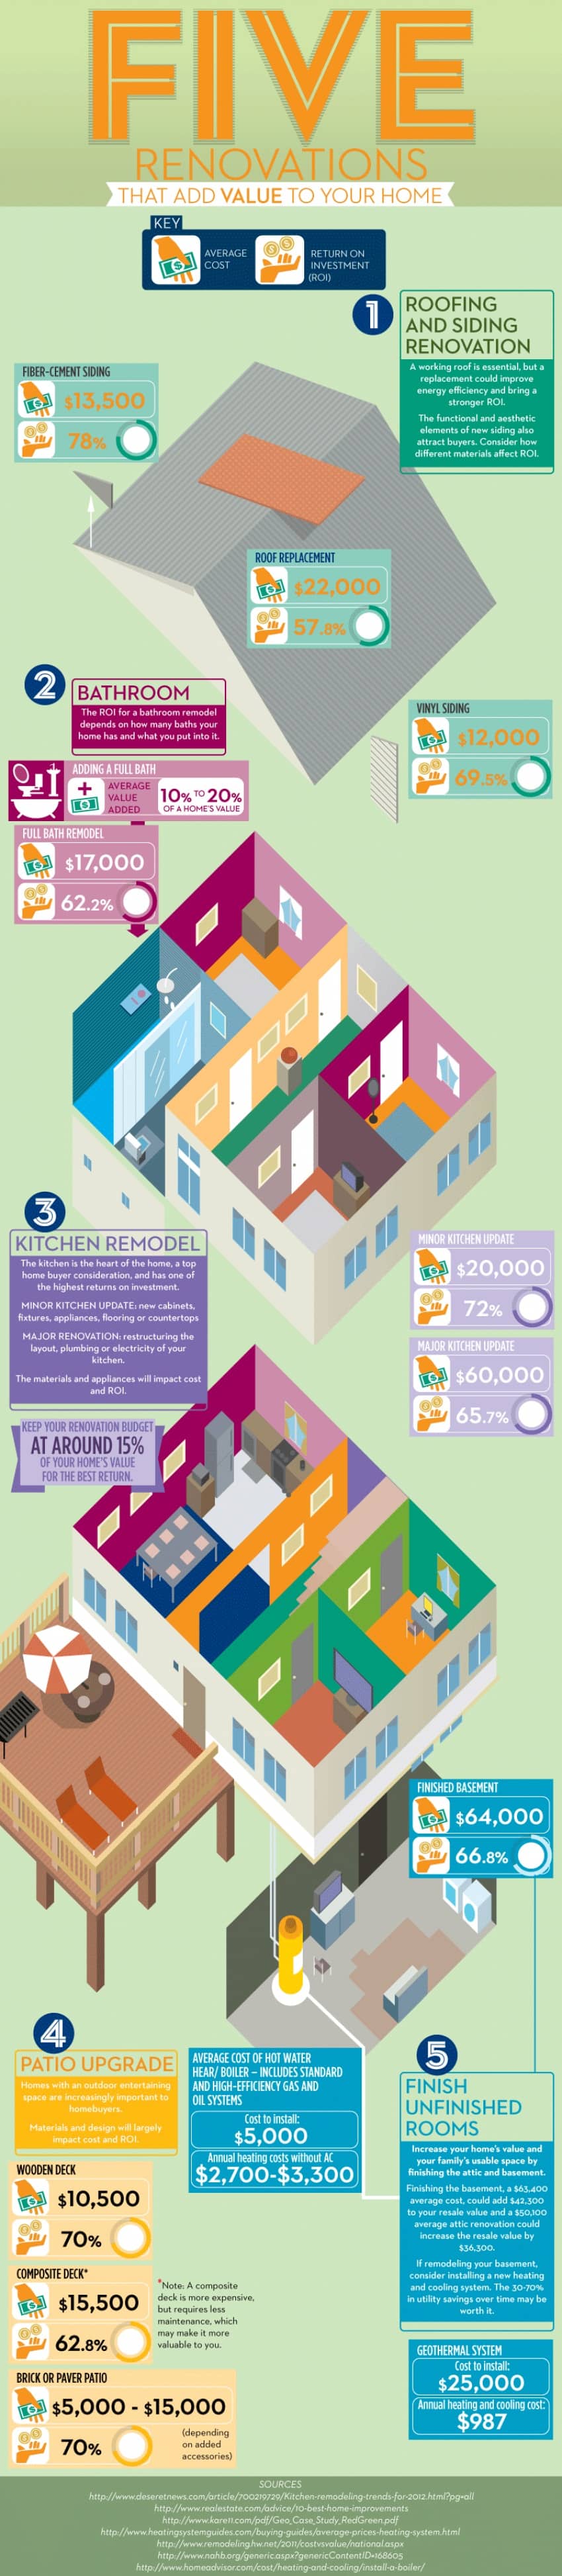
This is another infographic that is related to adding extra monetary value to your home. It discusses five renovations with their cost and return on investments for each one. Home improvement projects are interesting because they don’t only renew parts of your home but they add also in the bottom-line of a possible sale price in the future.
Let’s see the five home renovations described in the graphic above:
ROI = Return on Investment
-ROOFING AND SIDING RENOVATION
- Roof replacement: Cost $22,000 / ROI=57.8%
- Fiber-Cement Siding: Cost $13,400 / ROI = 78%
- Vinyl Siding: Cost $12,000 / ROI = 69.5%
-BATHROOM
- Adding a full bath: Average value added: 10% to 20% of home’s value
- Full bath remodel: Cost $17,000 / ROI = 62.2%
-KITCHEN REMODEL
- Minor Kitchen Update (new cabinets, fixtures, appliances, flooring or countertops:Cost $20,000 / ROI = 72%
- Major Kitchen Update (restructuring the layout, plumbing or electricity):Cost $60,000 / ROI = 65.7%
-PATIO UPGRADE
- Wooden Deck: Cost $10,500 / ROI = 70%
- Composite Deck: Cost $15,500 / ROI = 62.8%
- Brick or Paved Patio: Cost $5,000 – $15,000 / ROI = 70%
-FINISH UNFINISHED ROOMS
- Increase your home’s value by finishing the attic and basement. You will also increase the usable space of the house.
24) How to organize your closet

source: http://www.strategiesonline.net/how-to-organize-closet/
This infographic starts with a great quote “For every minute spent organizing, an hour is earned”. Indeed, spending some time organizing your closet will save you tons of time when you are in a hurry at the morning trying to find your clothes for work.
The graphic above has some great information and tips to help you clean up and put some order in your closet. Let’s see some important tips and suggestions from the diagram:
Initial steps to organize your closet:
STEP1: Clean Up
- First, take everything out from the closet and put them in 3 piles (keep, store, donate).
- Put everything you haven’t used in the last year in the donation pile.
- Put some air freshness in the closet.
STEP2: Color coordination
- Start with one item of clothing at a time, put the same color together.
- Keeping colors together makes things easier to find.
STEP3: Placing items in the closet
- Make room by storing out-of-season items in boxes above the closet or under the bed.
- Keep your favorite clothes (the ones you wear most often) in your closet’s prime area.
- Store your lesser-used pieces below and least-used items high.
STEP4: Accessories and handbags
- Store small handbags, belts, and hats on hanging hooks.
- Put scarves on tie racks.
- Mount a pegboard for your necklaces & earrings.
STEP5: Shoes
- Use boxes, cobbles, shelves, or a hanging organizer to sort shoes.
- Stuff your boots with a rolled up magazine or tissue paper to avoid wear and tear.
Types of hangers
- Wood hangers: Used for suit jackets.
- Plastic hangers: Used for button down shirts.
- Padded hangers: Used for delicate fabrics.
Some facts
- You wear 20% of your clothes 80% of the time.
- Treat your closet like a storefront cloth shop.
25) Bedding Size Chart
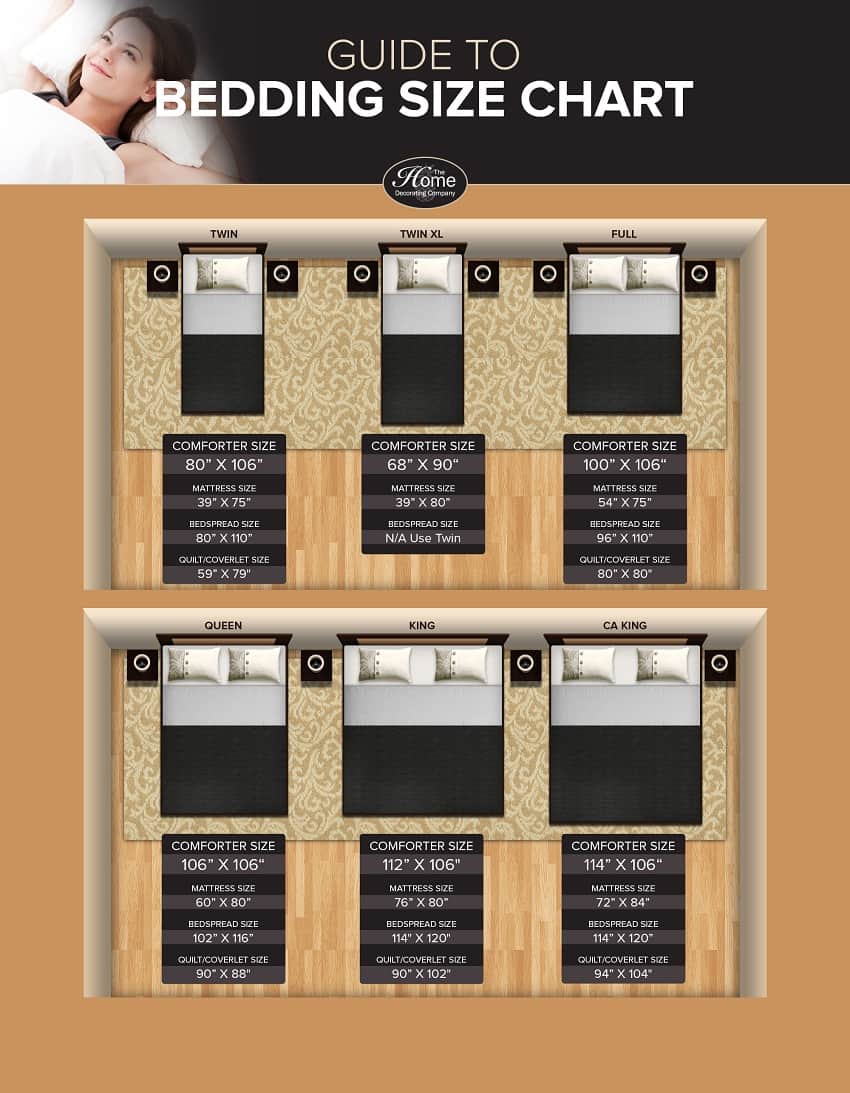
source: http://www.home-decorating-co.com/
Here is another useful infographic about bedding sizes for each type of bed. You will see what dimensions of comforter, mattress size, bedspread size and quilt size you will need for each type of bed.
TWIN BED
- COMFORTER SIZE: 80” X 106”
- MATTRESS SIZE: 39” X 75”
- BEDSPREAD SIZE: 80” X 110”
- QUILT/COVERLET SIZE: 59” X 79”
TWIN-XL BED
- COMFORTER SIZE: 68” X 90”
- MATTRESS SIZE: 39” X 80”
- BEDSPREAD SIZE: Use Twin
FULL BED
- COMFORTER SIZE: 100” X 106”
- MATTRESS SIZE: 54” X 75”
- BEDSPREAD SIZE: 96” X 110”
- QUILT/COVERLET SIZE: 80” X 80”
QUEEN BED
- COMFORTER SIZE: 106” X 106”
- MATTRESS SIZE: 60” X 80”
- BEDSPREAD SIZE: 102” X 116”
- QUILT/COVERLET SIZE: 90” X 88”
KING BED
- COMFORTER SIZE: 112” X 106”
- MATTRESS SIZE: 76” X 80”
- BEDSPREAD SIZE: 114” X 120”
- QUILT/COVERLET SIZE: 90” X 102”
CA KING BED
- COMFORTER SIZE: 114” X 106”
- MATTRESS SIZE: 72” X 84”
- BEDSPREAD SIZE: 114” X 120”
- QUILT/COVERLET SIZE: 94” X 104”
Related Posts
- Dorm Door Decoration Ideas: Make Your Space Unique
- Types of Sofas & Couch Styles – 40 Sofa and Chair Photos + Buying Guide
- 8 Renovations that Add Luxury and Style to Your Home
- 8 Creative Ways to Redecorate Your Home Office
- 8 Unique Decor Ideas to Brighten Up Your Home
- Awesome Additions You Should Consider for Your Home
Thanks for all these wonderful cheat sheets. do to have any on kitchen design ?
Great cheat sheets