A portable air conditioner is an excellent option to cool or dehumidify your bedroom or office instead of full-scale air conditioner. There are many benefits of using a mini air conditioner such as being cost-effective, convenient as well as reliable.
Most of the best portable air conditioners share many similar features, but somehow they differ in other aspects. For instance, portable air conditioner reviews provide detailed information about the critical elements of each brand. As the name suggests, a portable air conditioner is mobile and designed for use in a room or office.
However, there are specific steps you should follow when setting up a mini portable ac unit. The proper installation process can help to extend the lifespan of the gadget while at the same time improving its performance. The following tips can help you set your device correctly.
Installing A Portable Air Condition
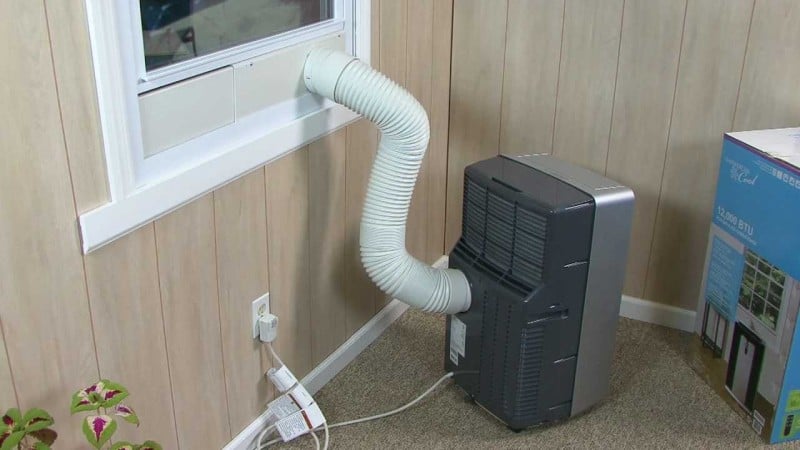
All portable air conditioners come with window kits, and proper installation is vital to ensure that they exhaust hot air during the cooling process.
When using a manufacturer window kit, most portable ACs are easy to install. A standard window kit comes with one or two vent hoses, window bracket as well as vent hose adapters. These components are easy to join since they naturally fit where they are supposed to be.
The average length of a vent hose is between four and five feet meaning that you should install a portable air conditioner closer to a window. In some cases, a wall vent can also be used to exhaust heat if there is no standard window. The following steps can help you quickly set up your gadget.
Step 1
When there is no standard window in the room you want to install the unit, you can create one on the wall or near a sliding window. You should use a jigsaw to create a hole that is approximately four inches in diameter.
When creating a vent on the wall, make sure that you choose an appropriate location that is suitable for the gadget. The distance between the device and the wall should correspond with the length of the hose so that you may not be forced to extend it. The hole should pass through to the exterior of the wall. You should also ensure that the hose fits in such a way that it does not disturb free passage of heat.
The other aspect that you should consider is that the wall vent should be closer to a power point. The location should be strategic such that installation of the unit will not give you problems. The components provided by the manufacturer should guide you in preparation of the wall vent.
Step 2
After drilling the hole, you should apply silicone caulk to rear surface on the wall vent. Silicone is, and it prevents moisture from getting inside the room. You should always remember that a portable air conditioner should be free from moisture.
If hot air passes through the vent that is not sealed correctly, it can affect the performance of the gadget. The device will end up working extra hard to cool the room, and this is not desirable since this can affect its lifespan.
Step 3
After inserting the vent through the wall, you must secure it with screws to prevent any movement. If the hose shakes, it can create a gap that can allow air to get inside the room. No air should get inside the room from outside to avoid overworking the gadget.
Step 4
When inserting the flexible duct to the exhaust port at the back of the air conditioner, make sure that it is secure. You should twist and lock it such that heat does not escape through loose connections.
Step 5
Step 5 is easy since you only need to connect the end of the duct to the wall vent. You should check that the tube is not twisted such that it can choke heat as it passes through it. To prevent any leakages of heat, you should seal the duct with foil tape.
Step 6
When you are sure that all connections are in place and they are airtight, then you can plug the portable air conditioner into an electrical outlet. The product comes as a compact unit so you should not worry about assembling anything. You need to connect it to power, and the setup process is complete.
Step 7
After turning on the unit, you can then set the thermostat. Step 7 is the last but continuous process you should do whenever you want to turn on the unit. The gadget has a timer, and you can set it as you desire or when you want to use it. However, installing a portable air conditioner is not the end in itself since you need to monitor it continuously.
Avoid Extending Vent Hoses
When setting up a portable air conditioner, you should avoid trying to extend the vent hose since it can lower its efficiency. The original tube that comes with the unit is enough for venting purposes. The moment you stretch it, you may not be able to claim warranty after the gadget malfunctions.
Connecting a heat exhaust of a portable air conditioner to a dryer vent in is not usually recommendable. Most exhaust hoses are larger than dryer vents, but if the two have an equal diameter, you can connect it. Make sure that there is no flap on the external opening on the dryer vent. Hot exhaust air from the unit may not be able to push it hence the need to replace the fold with a screen.
Installing a portable air conditioner is a simple task as long as you carefully read the instruction manual. You can follow the same steps and procedure to connect the device in any room in your home. You only need to be creative while at the same time making sure that the whole process is correct right from the beginning.
Related Posts
- How to Stop Sliding Doors from Rattling – Causes and Solutions
- Cheap Ways to Heat a Room – Efficient and Budget-Friendly Solutions
- 11 Ways to Get Rid of Cooking Smells in a Small Apartment or House
- 11 Stores and Sites Like IKEA For Affordable Furniture and Home Products
- All About Polypropylene – Olefin Fabric Sofa Material
- 12 Different Types of Wood for Outdoor Furniture with Pros/Cons
Leave a Reply